Uncategorized

How You Can Get Google To Index Your Website Instantly 2019

In this post, we’re going to take a look at how you can use Google’s new indexing API to get your website’s pages and content crawled immediately rather than having to wait! 🖖

Still not convinced?

Here’s why this really is worth the extra effort. 

  1. Rank faster (especially important for time-sensitive content)
  2. Increase your chances of ranking above your competition
  3. Keep search results up-to-date for higher quality user traffic

Namely, you want your content to rank both higher and faster which is extremely important when it comes to time-sensitive competitive content. Using this method, you can stay one step ahead of your competition by making sure that your site is crawled and has the opportunity to rank before their site does.

The process of setting this up isn’t typically very easy, but if you follow this step-by-step guide, you’ll be up and running (or, I guess you could say up and ranking) in no time! So, without further ado – let’s jump right in and take a look at how to set this up.

1. Go to the Google API Console and create a new project

Ensure that you’re creating a new Indexing API project which you can do automatically by clicking here.  And then click continue.

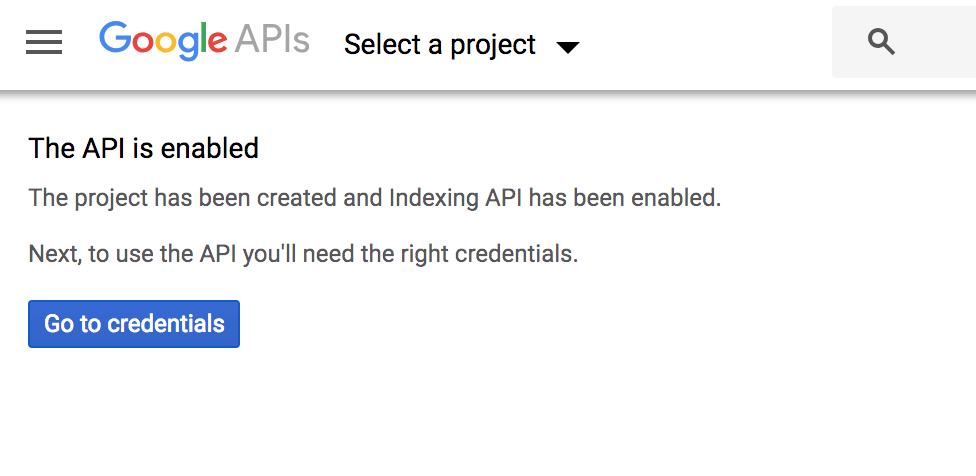
If you see the following screen then you’ve successfully created the project:

Please note: There is no need to click ‘Go to Credentials’ button. You can close this tab.

2. Now create a Service Account

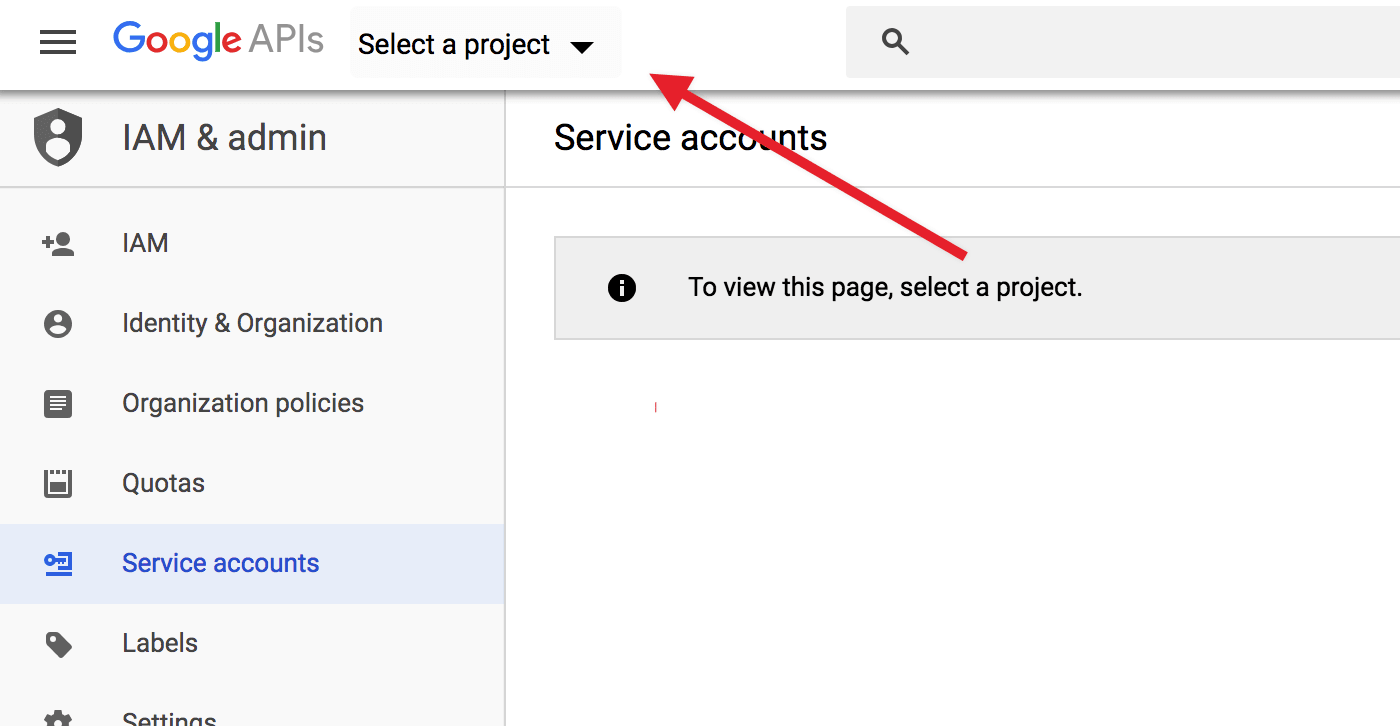
Once you’ve created your project, create a service account by opening the service accounts page. And, if prompted, select the project you just created using the button near the top of the page:

And once you have selected a project, click the Create Service Account button highlighted below:

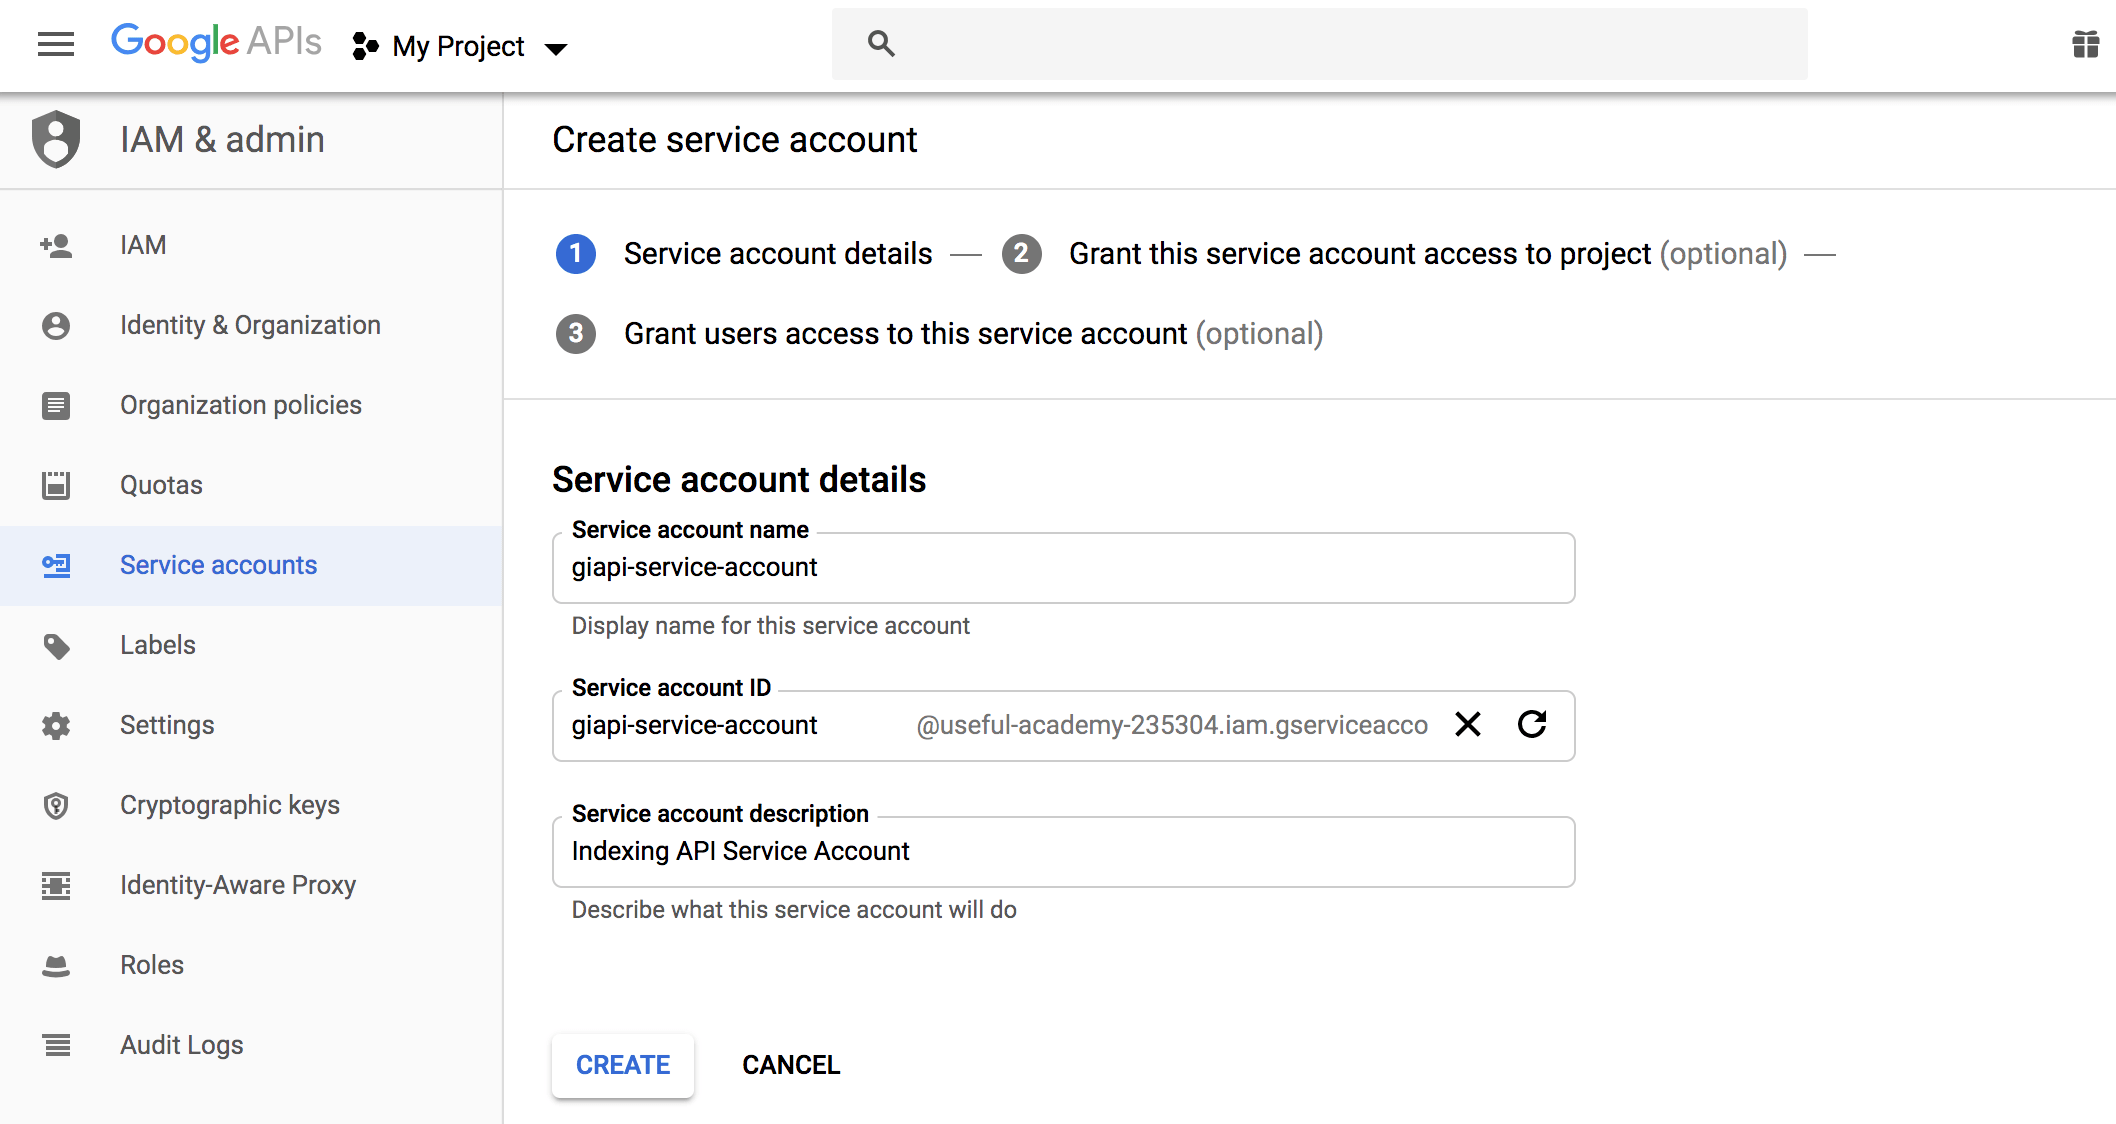
On the Create service account screen, enter a name and description for the newly created service account.

Select and copy the whole Service Account ID (the one that looks like an email address) because you will need it later. Then, click on the Create button at the bottom:

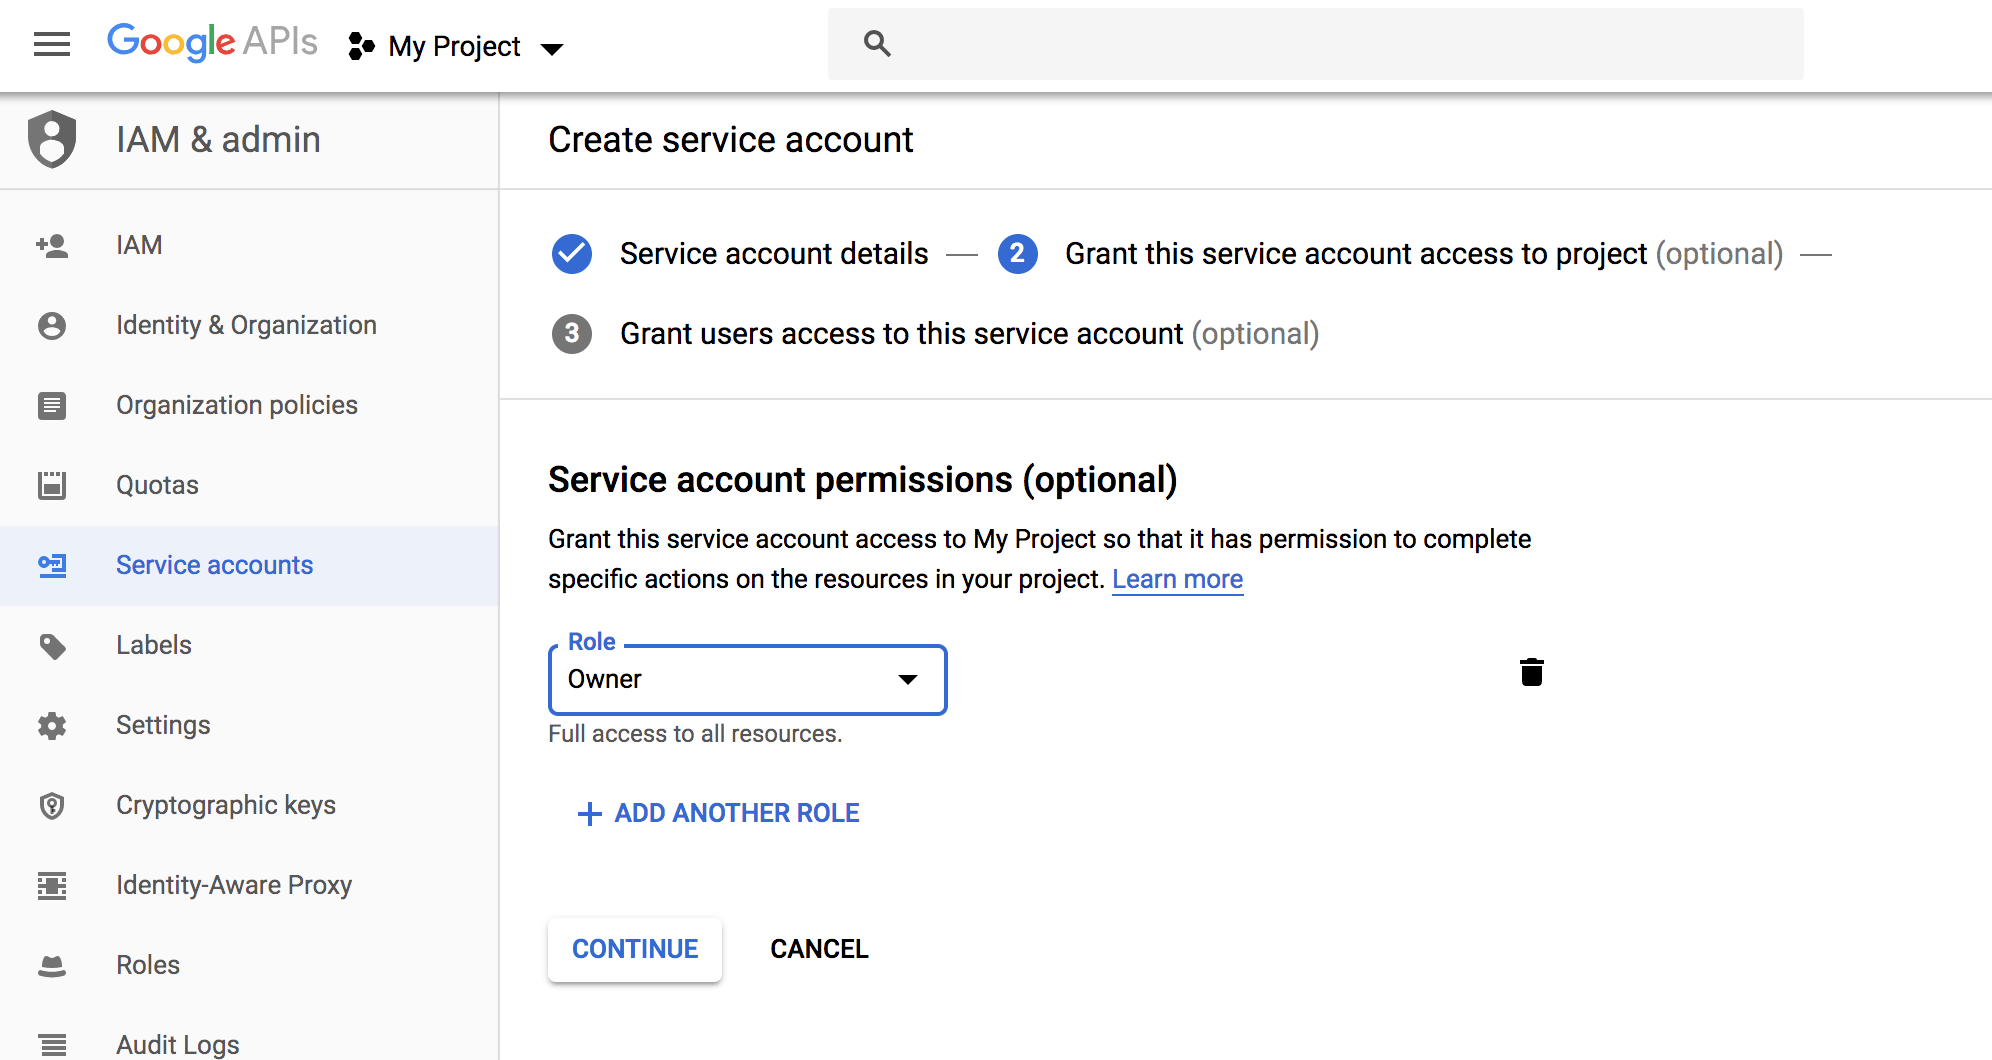
Once you’re taken to the next page, don’t forget to change the role to Owner and, as you might’ve guessed, click continue…

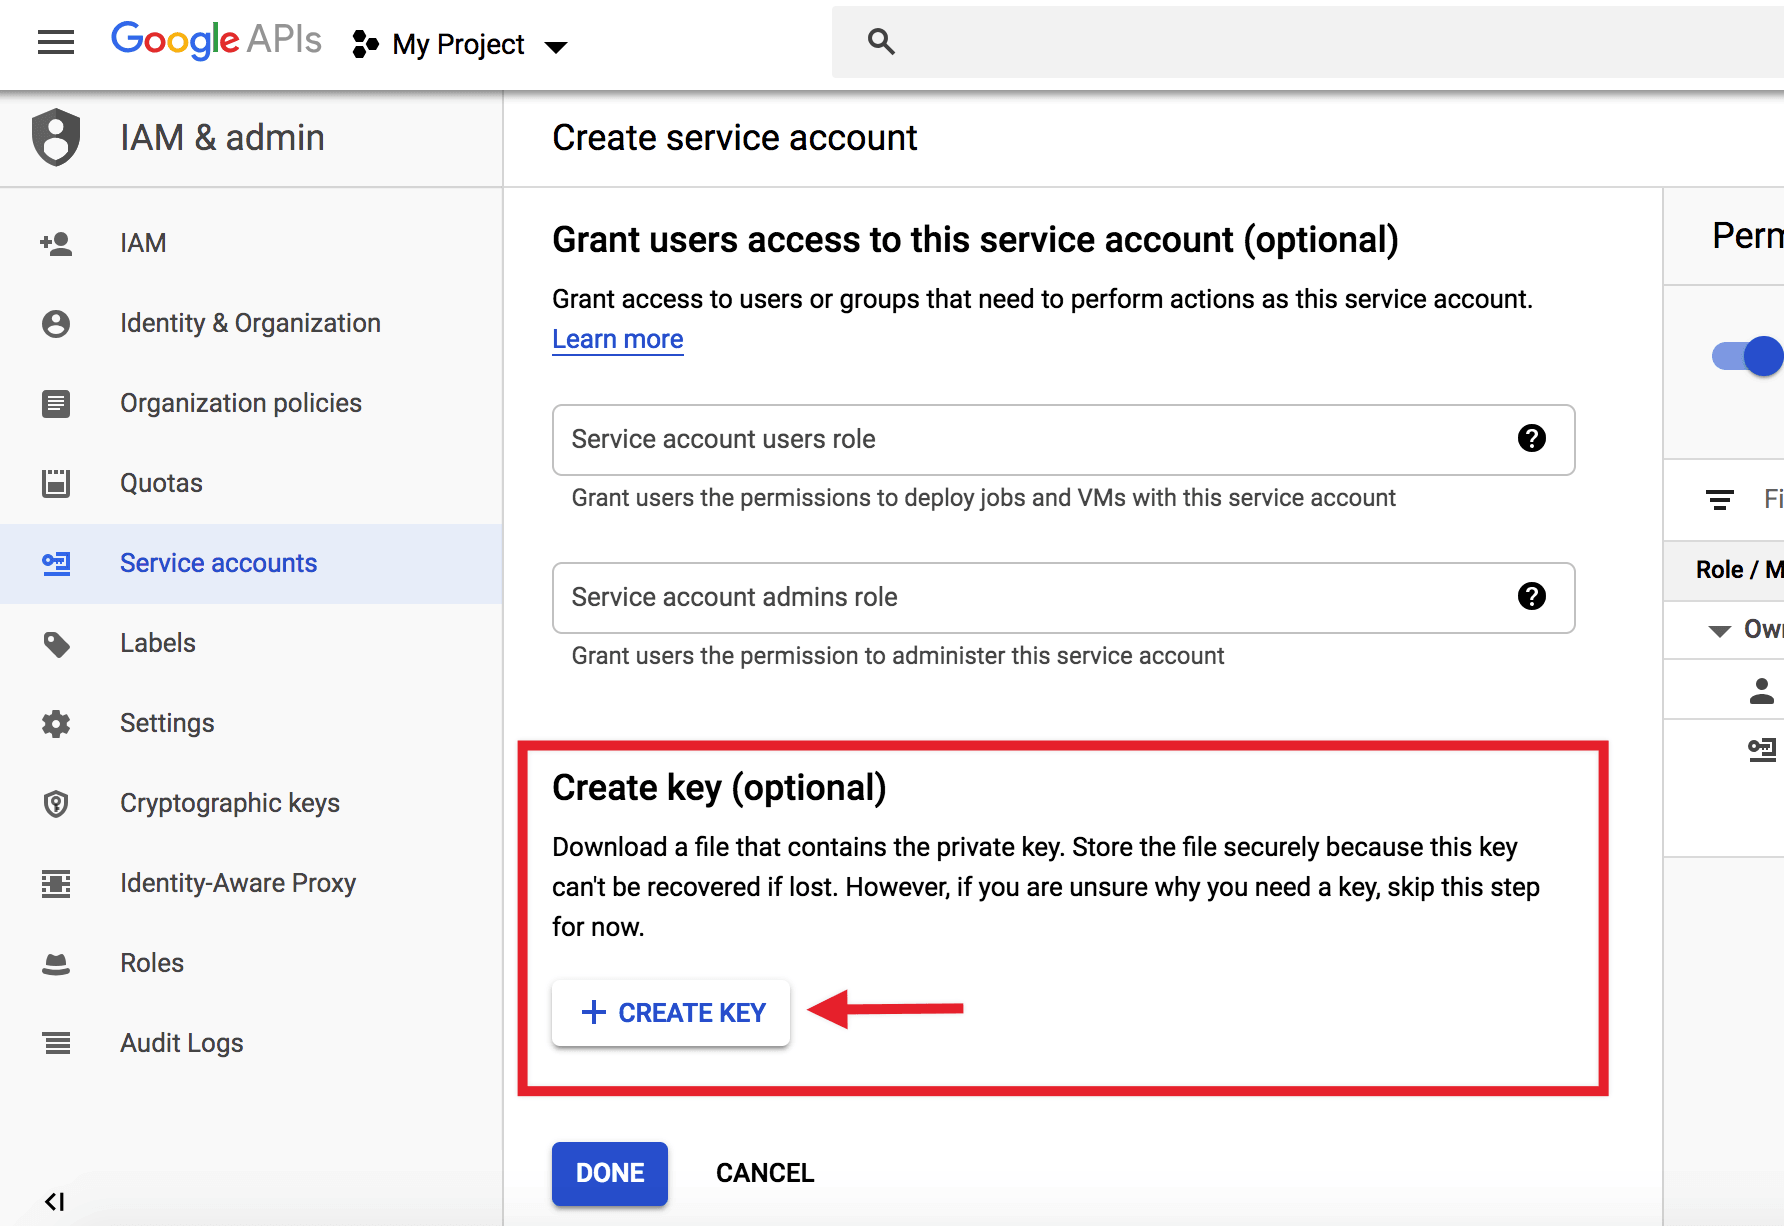
Now download the file that contains your API key by clicking the Create Key button:

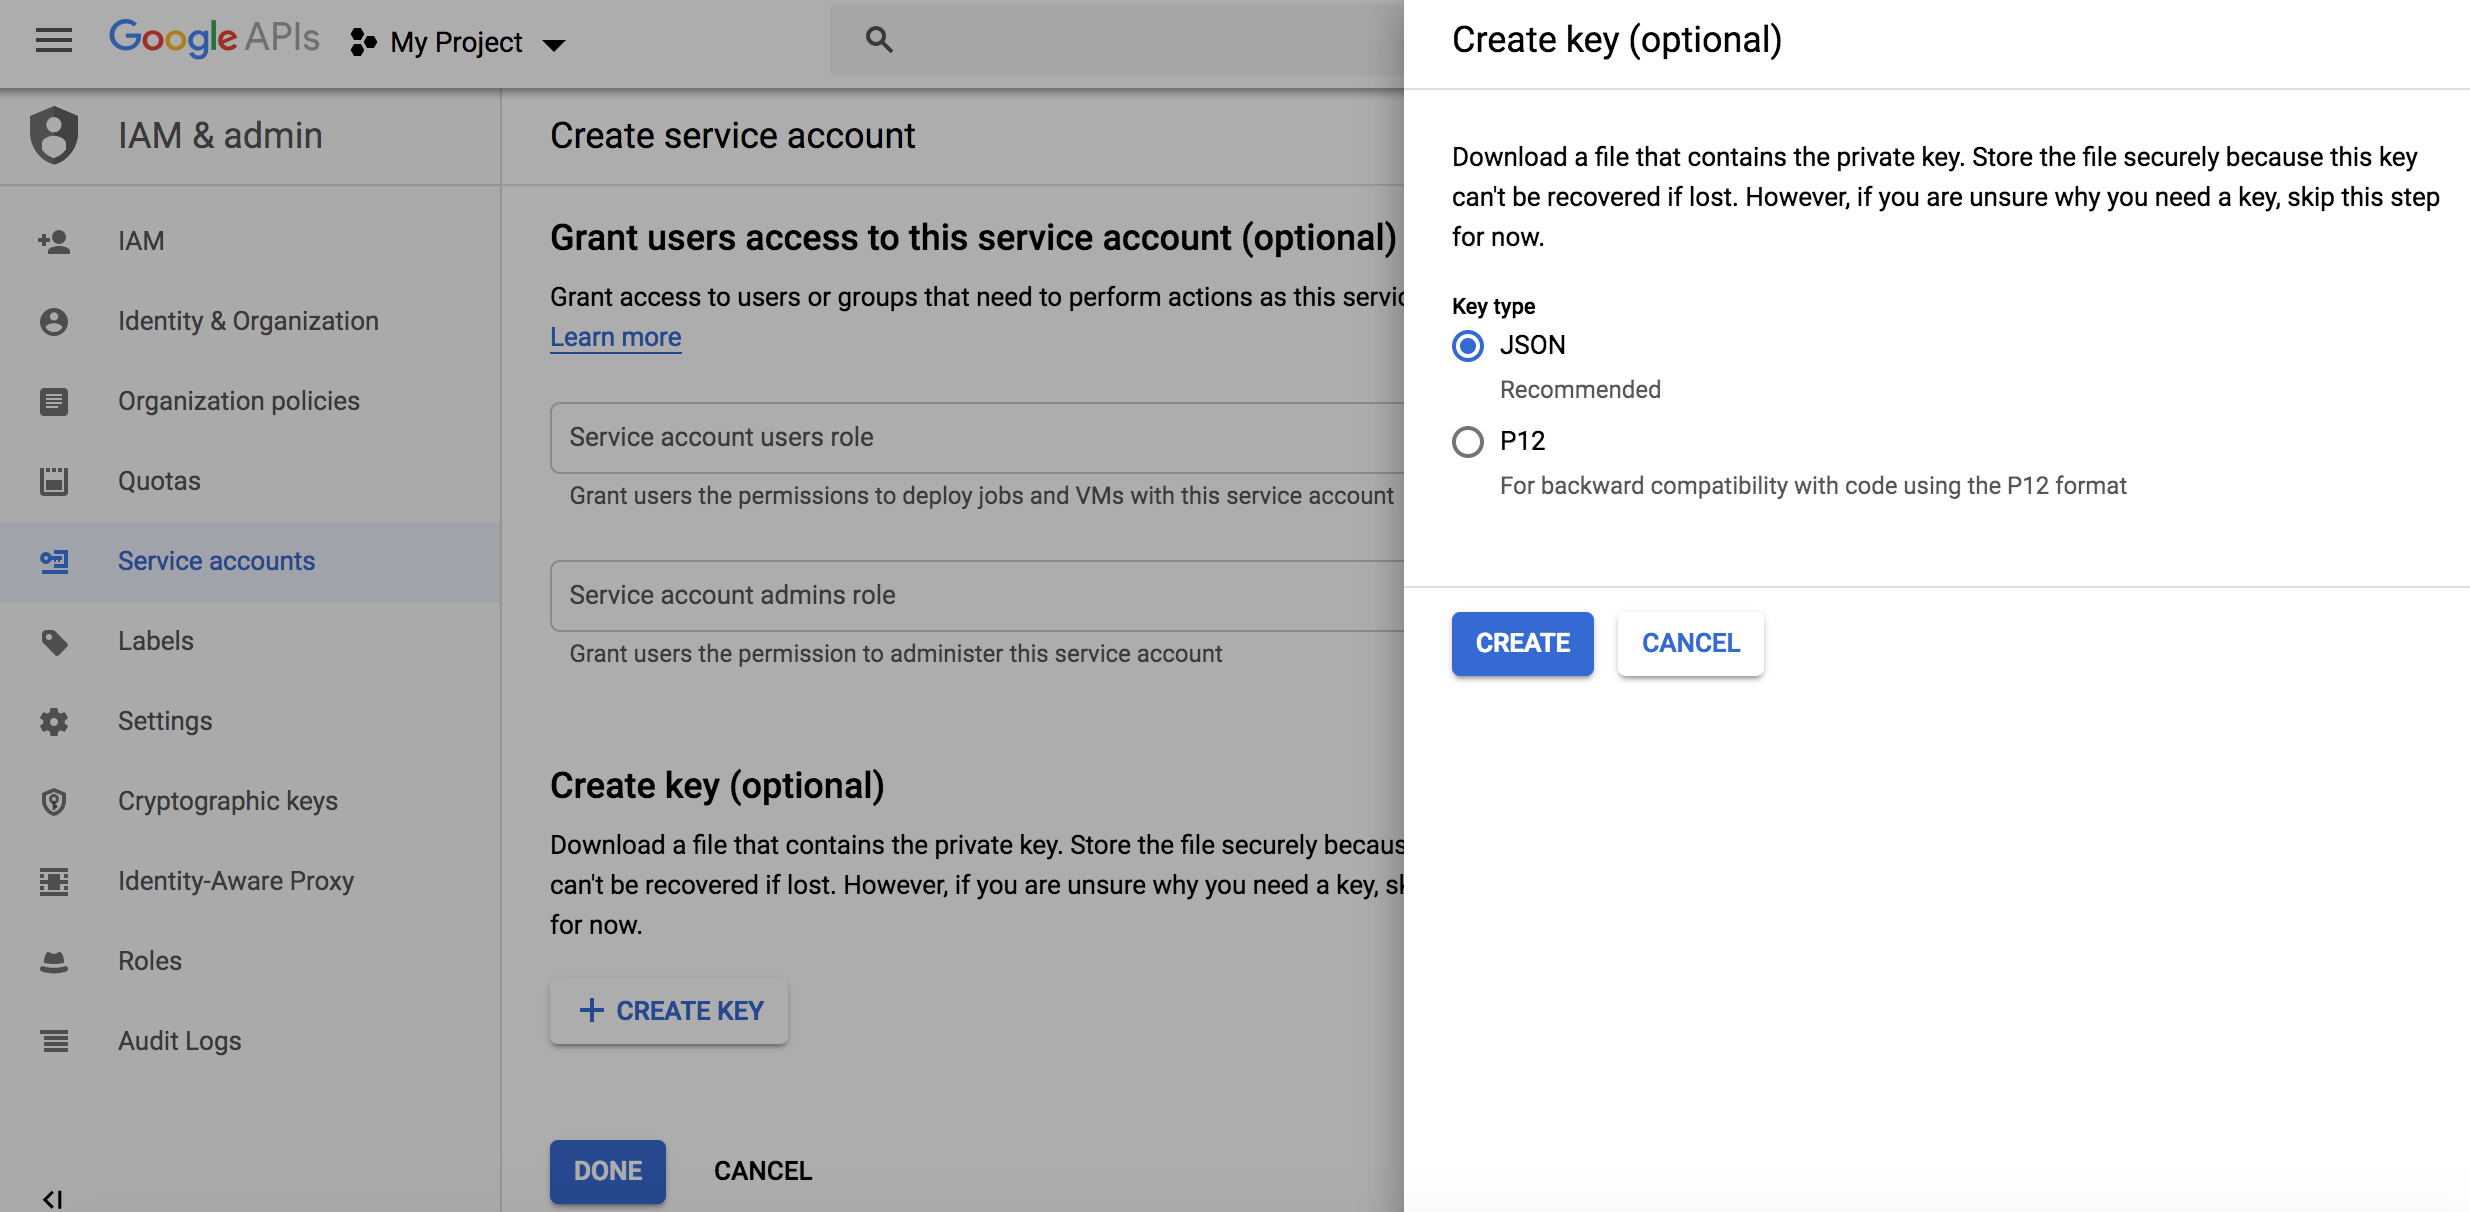
Choose the default JSON format when prompted in the overlay, and click Create:

Once you’ve downloaded the file, rename the file to: rank-math-835b6feb842b.json

3. Add the Service Account as an owner of your Google Search Console Property

To do this, you’ll need to register and verify your website with the Google Search Console (if you haven’t done so already) which is super easy: just follow the recommended steps to verify ownership of your property.

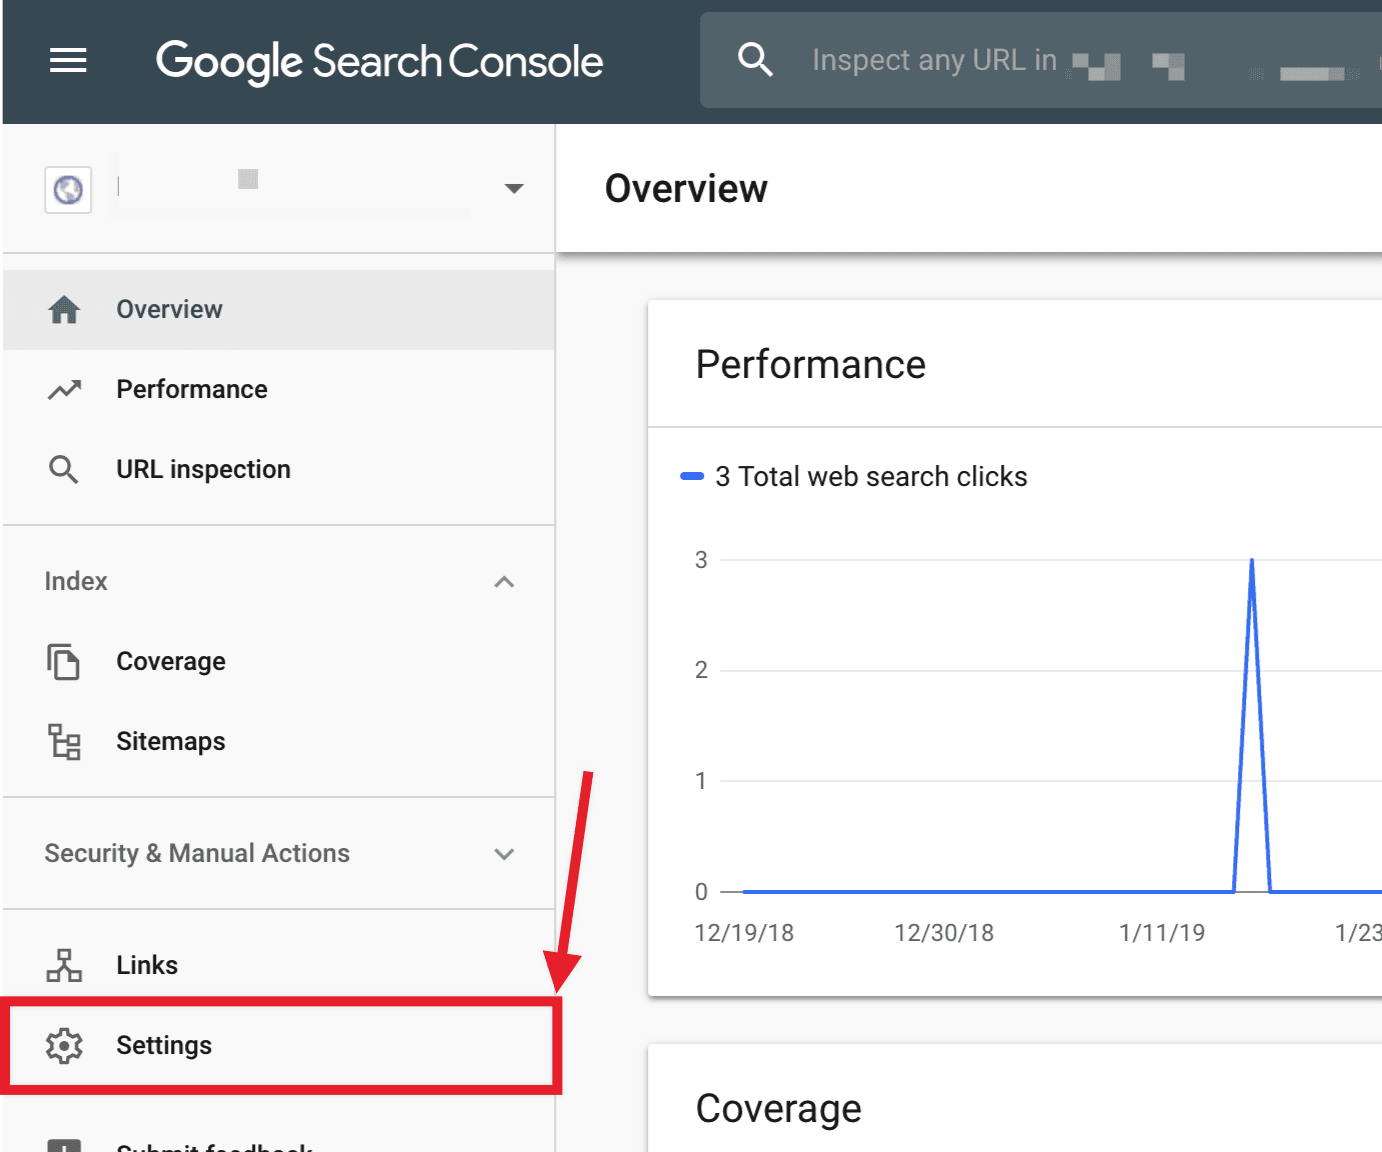
After verifying your property, open the Google Search Console, select your property on the left (if prompted), and then click on Settings near the bottom:

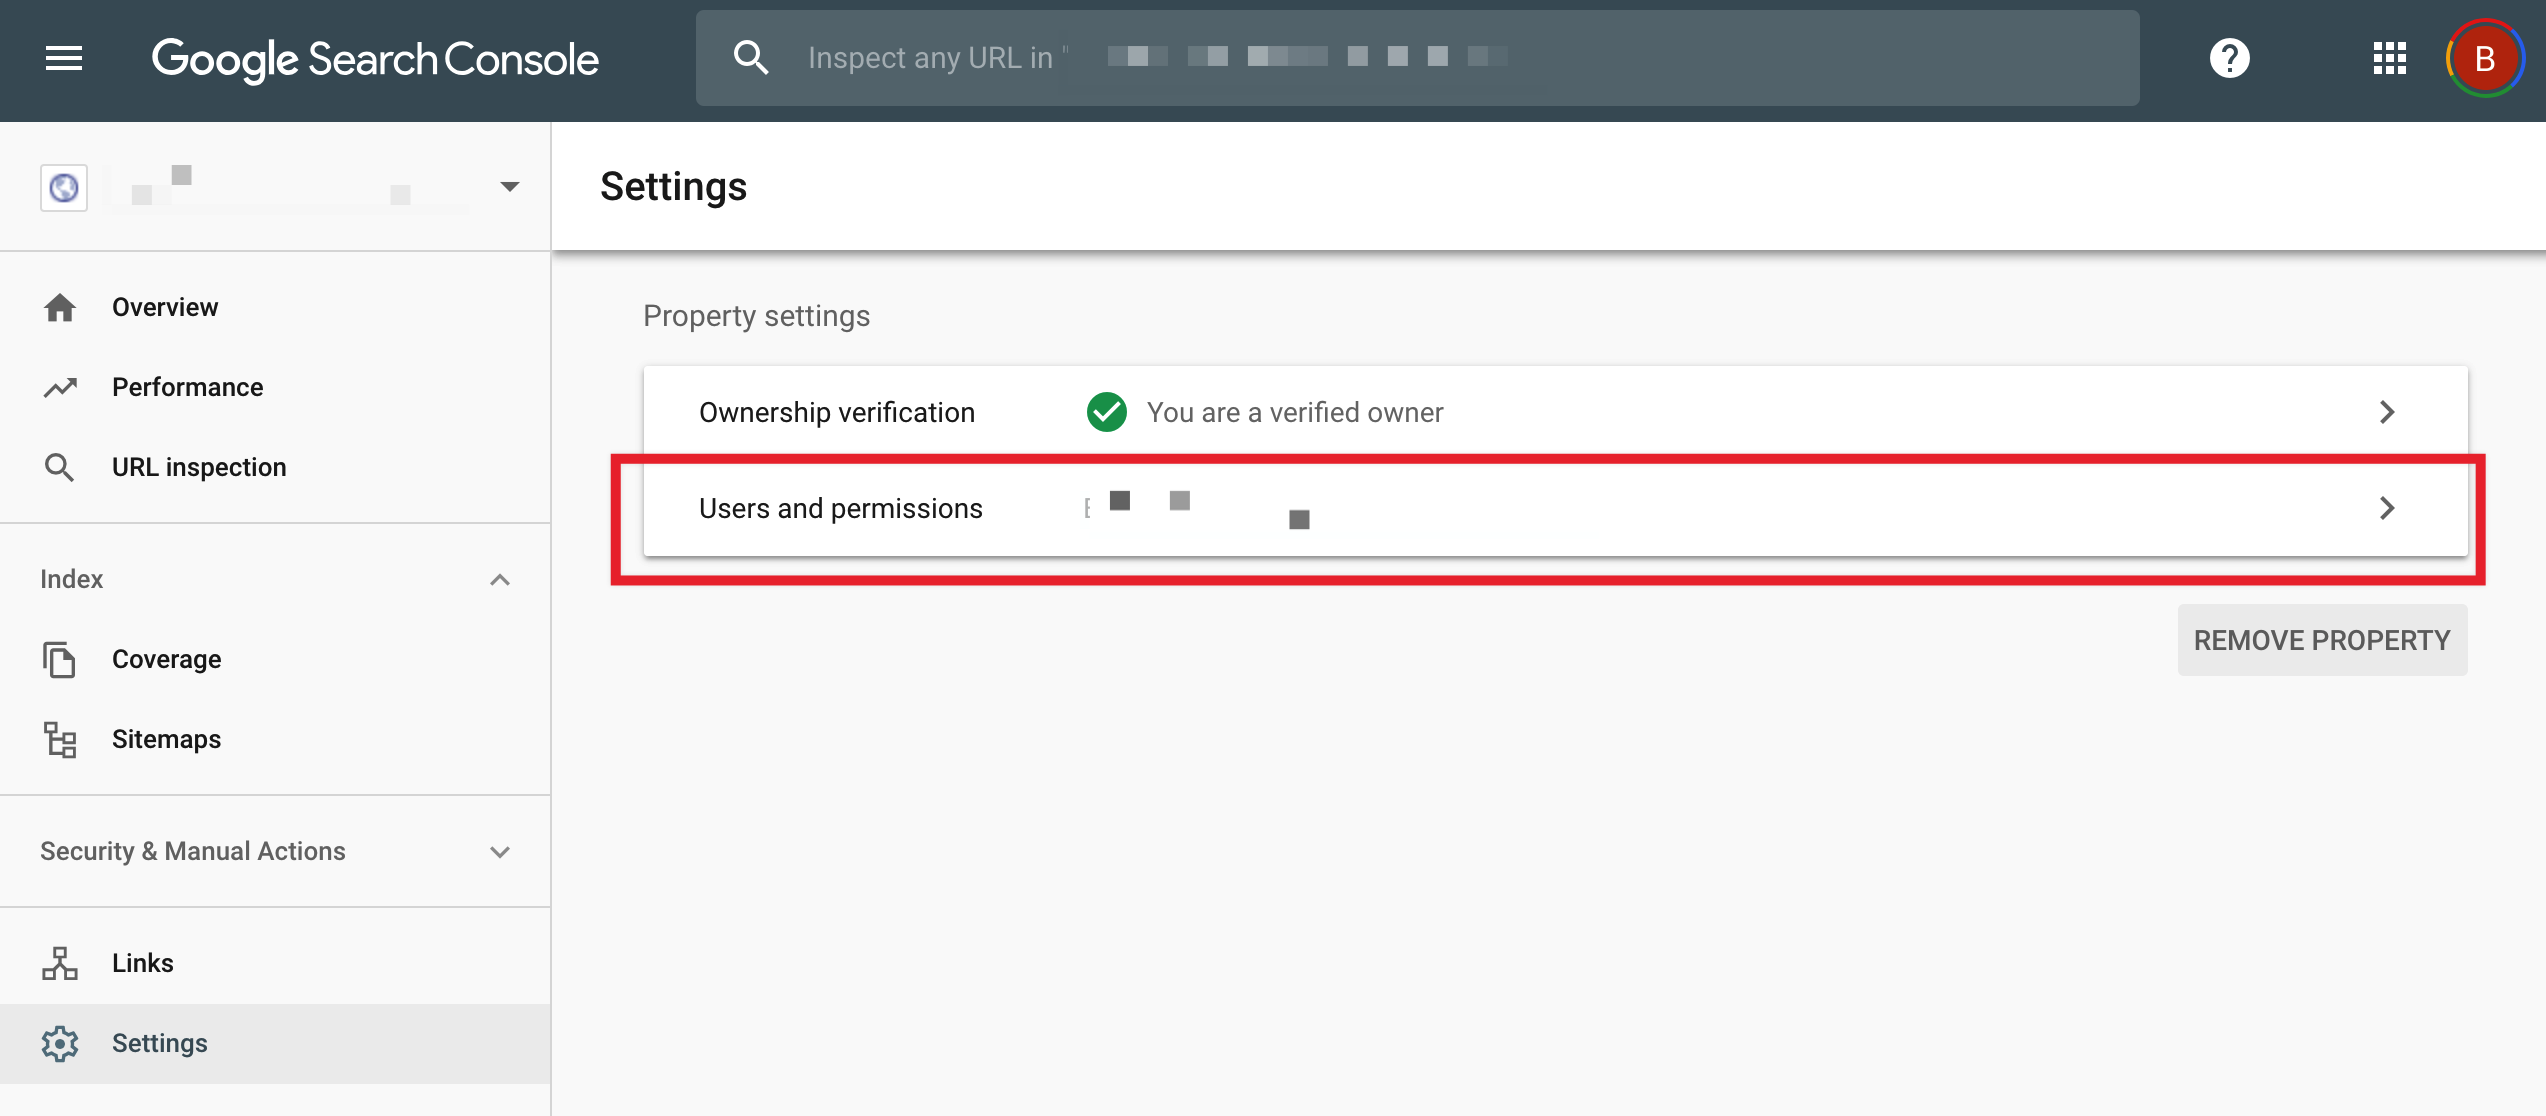
Click on Users and Permissions:

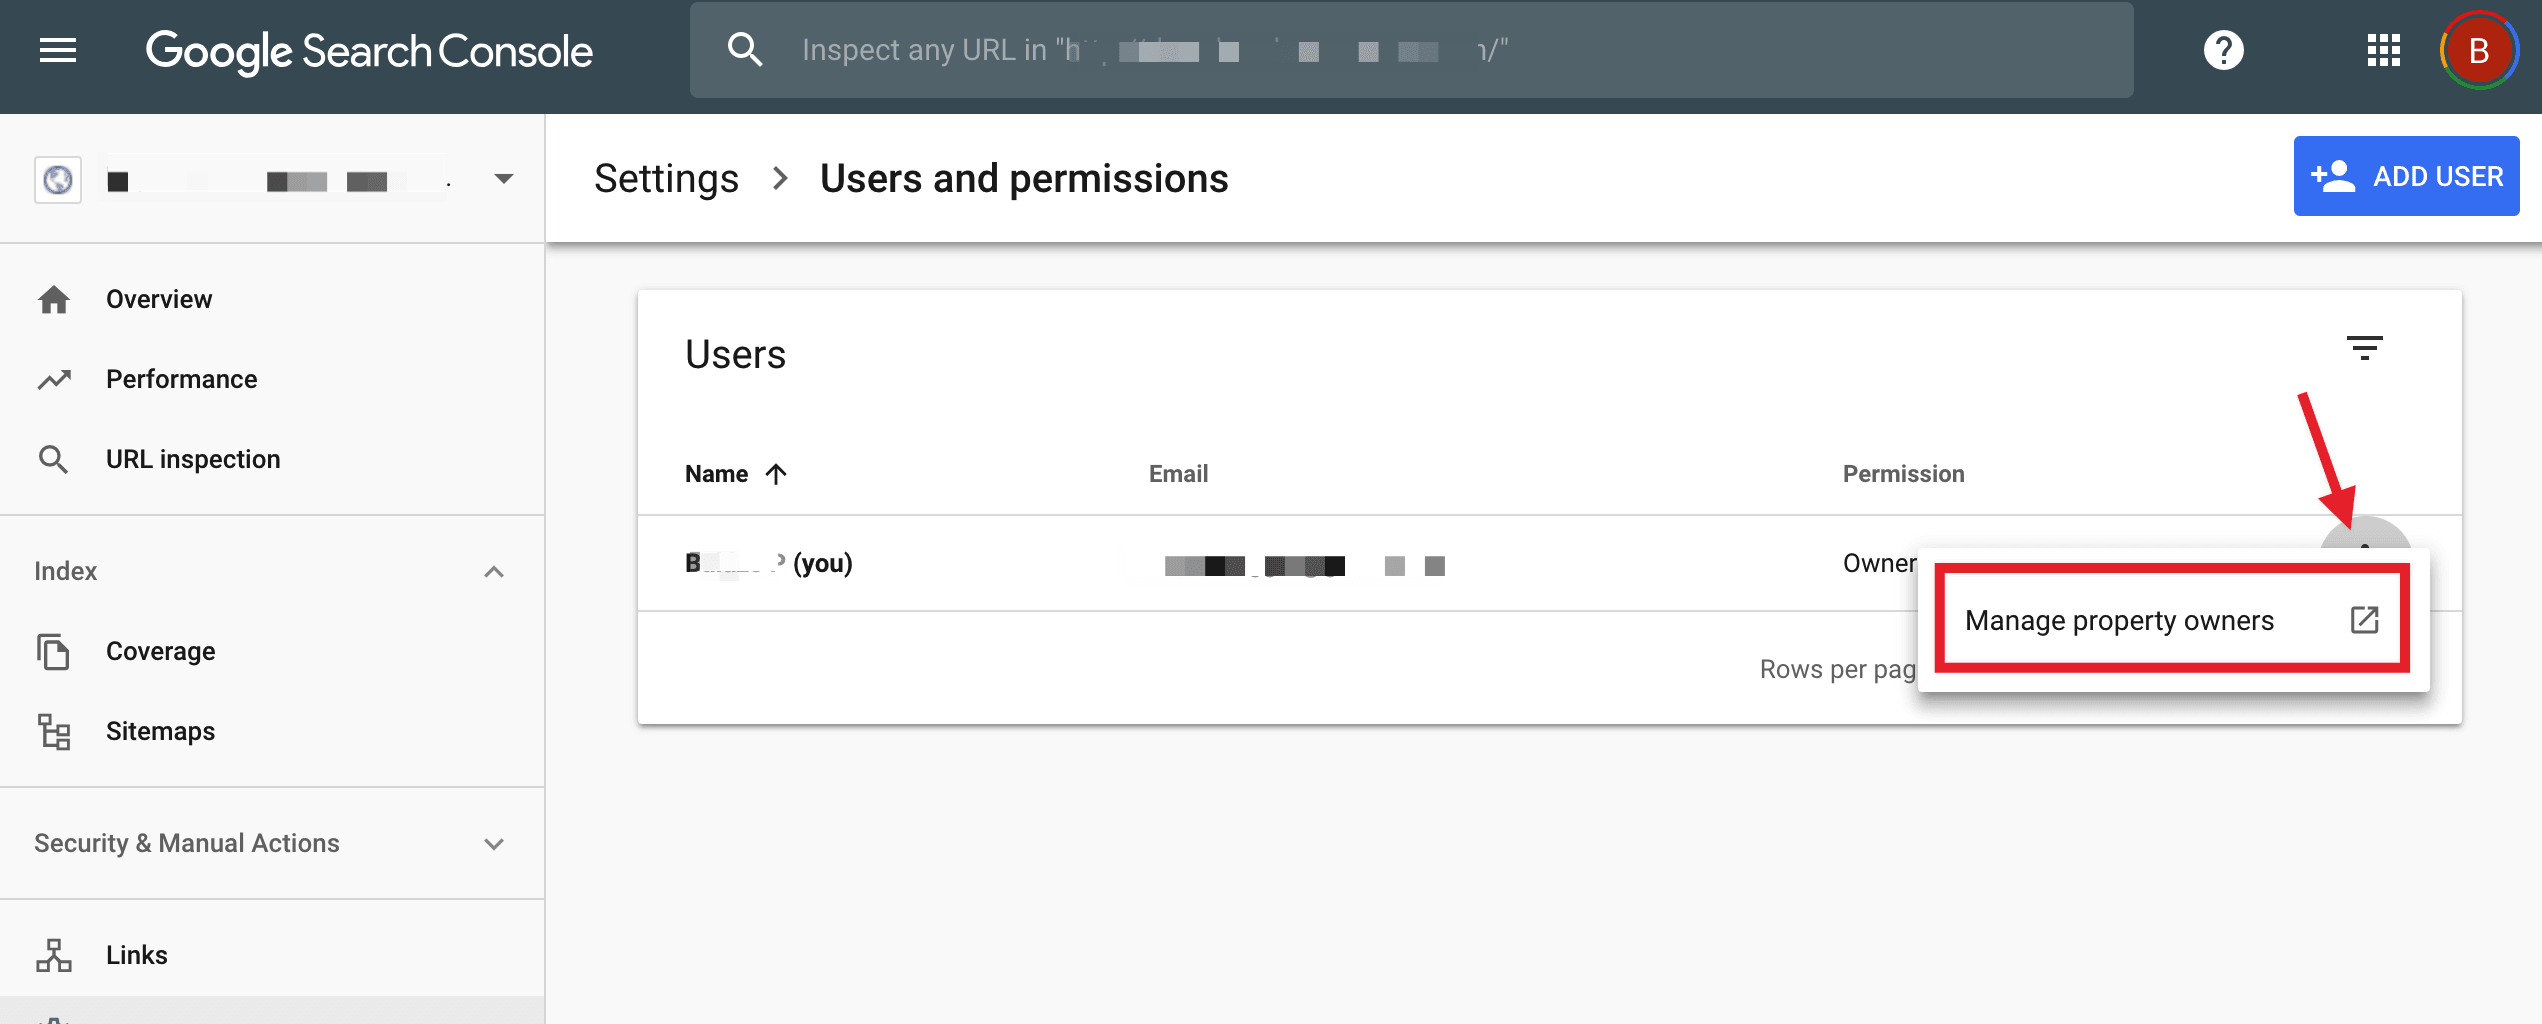
Click on the three dots next to your account, and then click on Manage property owners:

A page will open in a new tab. Scroll to the bottom and click on the Add an owner button in the Verified owners section:

A page will open in a new tab. Scroll to the bottom and click on the Add an owner button in the Verified owners section:

Enter the Service account ID (the one you copied out earlier) in the new owner’s email address field and click Continue:

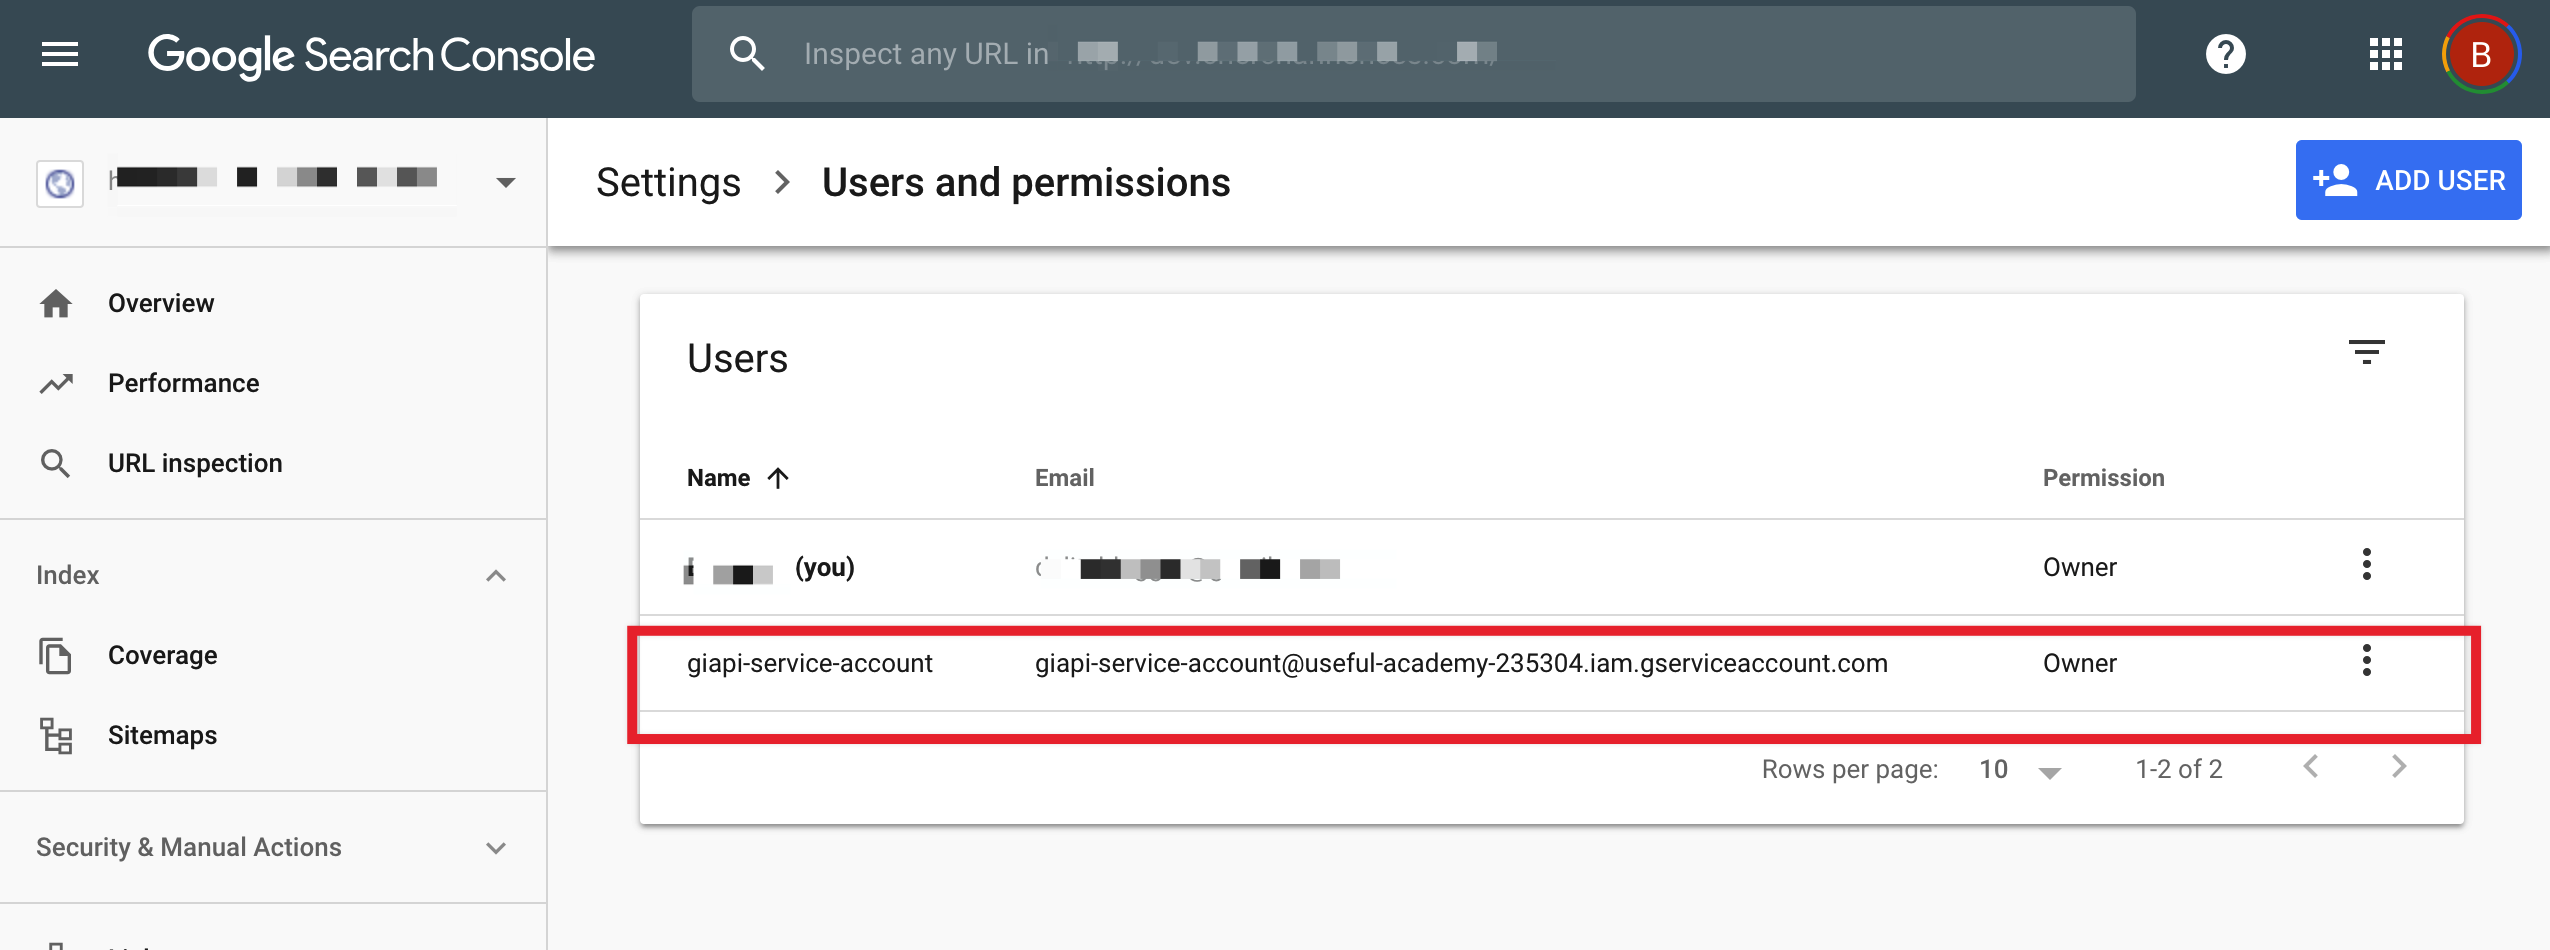
Switch back to the previous tab and refresh it. You should now see the Service account listed as a new Owner.

4. Place your API Key file in the plugin folder

All you have left to do is place your API key file rank-math-835b6feb842b.json in the plugin folder. Use an FTP client to upload the file in the /wp-contents/plugins/rank-math-google-indexing-api folder.

5. Now it’s time to enjoy getting any post or page on your site indexed almost instantly.

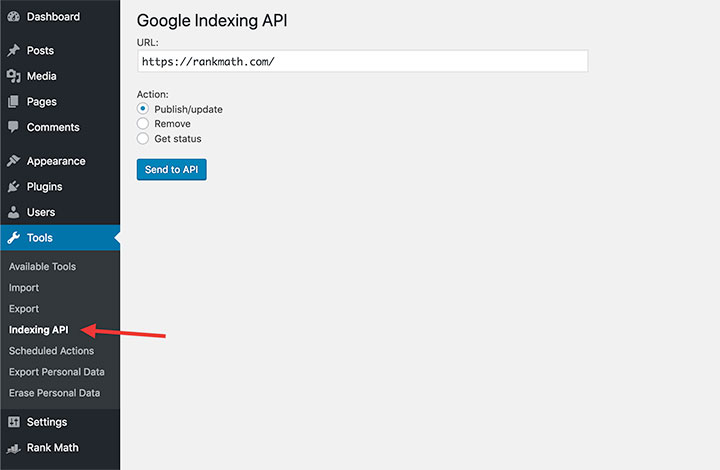
Rank Math Google Indexing API settings
Access Plugin’s Submit Page from the Dashboard.
Rank Math Google Indexing API Submit Page
Submit the Page.
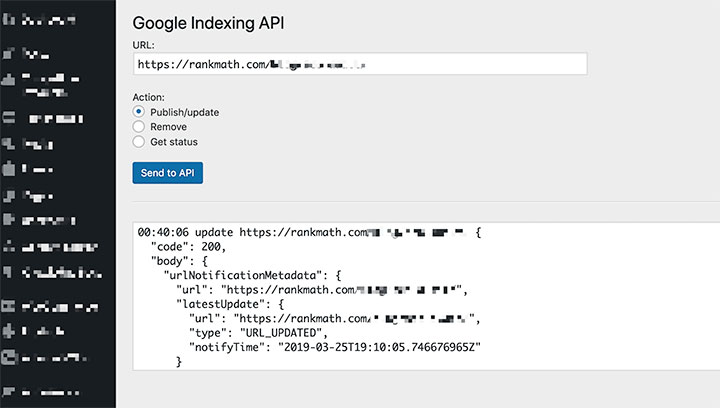
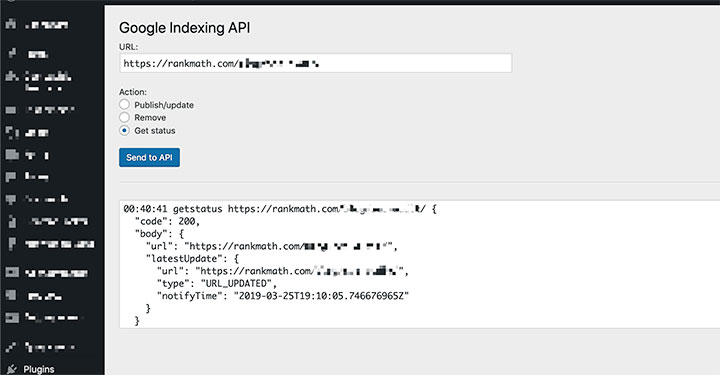
Rank Math Google Indexing API Status Check
Check the status of already submitted URL.

And that’s it! We hope that you were able to make great use of this guide to help you get up and running with Google’s Indexing API. So, getting Google to index your site instantly wasn’t all that complicated after all, was it? 😅

If you have any questions, comments or suggestions – feel free to leave a comment below. We can’t wait to hear from you…

Please Note: After submission it takes few minutes to index.

PS: It would be remiss not to mention that we got the idea for this post after reading this post that David Sottimano wrote about Google’s Indexing API.

Standard
Uncategorized

[HOWTO] Set Up PeerGuardian 2

PeerGuardian 2 is Phoenix Labs premier IP blocker for Windows. PeerGuardian 2 integrates support for multiple lists, list editing, automatic updates, and blocking all of IPv4 (TCP, UDP, ICMP, etc), making it the safest and easiest way to protect your privacy on P2P.

PG2 Quick Guide:.

Install it:

Set it up:

Unless you are really paranoid then the P2P list should be good enough.:

Update daily:

Finish this part of setup:

PG2 will look for updates and download the current P2P blocklist:

[img]http://i12.tinypic.com/40623rm.jpg[img]

PG2 will then be working. You May want to disable showing allowed connections or you will have a hard time seing blocked ones.

You can do that here:

Now it will look like this, note its blocking the nasties:

To add more lists:

Select from this box, information on what each list does can be found at http://www.bluetack.co.uk.

The new lists will then be downloaded:

And the new List Cache will be generated:

PG2 will now be blocking incoming and outgoing connections to people who have no business sending you data or recieving data from you and your client.

*Note: Proceed at yer own risk. thanks to OG

Standard
Tutorials

[HOWTO] Xbox 360 Burning Guide

Imgburn is very similar to DVDdecrypter but for xbox 360 backups I think ImgBurn is better. ImgBurn and CloneCd are the best programs available for burning xbox360 backups. If you dont have ImgBurn you can Download it Here. XboxBackupCreator and Schtrom360Xtract v3.1 are also great and recommended for people with Samsung SH-D162C keron flashed drives.

If you’re just burning .iso .dvd files use ImgBurn. It has all the features you need built in and works extraordinarily well. Follow these steps exactly and you wont waste any of your expensive dvd+r dl discs.

Before you do anything Check and See if you have your booktype on your burner set to Dvd-rom. If you have the Pioneer 111D you can skip this step because it comes set already.
Ok if you dont have the dvd file you will have to make you own open note pad and type in these 2 lines of text

CODE
LayerBreak=1913760
IMAGE.000

Then save with your game iso
1. Open .dvd file in a text editor.

2. Copy layerbreak.

3. Open ImgBurn.

4. Goto Tools -> Settings

5. Goto the Write tab.

6. Change Layer Break to User Specified and paste the layerbreak in the Sectors in L0: box.

7. Save the settings and delete the LayerBreak= line from your .dvd file and then save.

8. Return to ImgBurn and click the Open icon. Select your .dvd file. Make sure verify is on! (optional)

9. Select your dvd burner. (Ensure booktype is set to DVD-ROM!).

10. Change write speed to 2x/2.4x.

11. Insert DVD+R DL disc and burn! <>

Standard
Tutorials

[HOW-TO]How to play DS games that you download.

If you have been referred to this link but you have an M3 cart, don’t worry! They are identical outside of the manufacturer’s website! This guide should answer all of your questions!


What is the R4?
The R4 is a hardware solution for playing games and other media that you have downloaded on you Nintendo DS/DS-Lite. Yes it works for BOTH.


What else do I need?
If you buy the retail version of the R4, the only other thing you need to buy is a MicroSD card. Google “MicroSD” if you don’t know what a MicroSD transflash card is, or you can check out it’s WIKI. Which MicroSD card is the best you might ask? The best/most popular card seems to be the Japanese Kingston 1GB. You can decide for yourself which card is best for your money using this list: Compatibility List. At the bottom of that page is a list of different brands of MicroSD cards, and any problems that people have encountered with them. Currently, they sell MicroSD cards up to 2GB, although they are working on 4GB versions.

How does the R4 Work? (Setting up your R4).
Inside the R4 is a slot in which a MicroSD transflash card fits (not included). The R4 comes with an adapter which allows you to connect this MicroSD card to your computer via USB. Once connected to your computer, you can copy and paste files onto the MicroSD card, as if it were a USB flashdrive. Once these files are on the MicroSD card, you can put the MicroSD card into the R4. The R4 fits into your DS (in the slot known as “Slot-1”, which is why the R4 is called a “Slot-1 Solution”.) That’s it. It’s that simple!


There are required files that you need to put on the card in order to run the R4. This is called the Kernel. Think of it as your R4’s operating system. The CD that comes with your R4 contains an older version of this Kernel. I suggest downloading the newest version from R4’s download page: R4DS Webpage. You’re looking to download the newest kernel in the language of your choice. If you are ever asked which version of R4 you are running, the kernel version is what you should refer to. (This newest version is “v1.11”). Newer R4 versions add features and compatibility not available on older versions. For example, v1.11 fully supports download play, where-as older versions support only certain games.

Regardless if you downloaded the newest version or opted to use the version that came with your R4, the setup is the same. Copy and paste the files (2 folders and 2 files) from the CD(retail)/RAR-file(download) into the root directory of your MicroSD card. [The “root” of any storage media is just the first window that pops up when you open the disk drive.] Included in these files is a folder called “moonshl”. This is moonshell. Think of it as a free add-on. Don’t worry about moonshell just yet, but copy it to your card anyway. After copying all of the files, you should now have the two folders (“_system_” and “moonshl”) and the two files (“_DS_MENU.DAT” and “_DS_MSHL.nds”) in the root of your SD card. That is all you have to do for setup.

You can eject your MicroSD card from your computer, put it in your R4, and boot up the R4 in you DS. When the screen loads, you will see the welcome screen, which has three options to choose from.
[1] Play Games,
[2] Play Media (audio/video/text),
[3] Play Slot-2 Device (Slot-2 is the GBA slot on your DS).


What can I play on my R4?
Your R4 with moonshell installed can play NintendoDS games, videos (MUST BE .DPG format), .mp3’s, .txt files, and some “Homebrew” applications.

Quote:
How many games can my R4 hold? -RabidDog


Your R4DS can hold as many games/videos/MP3s as your MicroSD can hold!
So obviously, the larger your MicroSD card, the more games you can play! I have a 2GB MicroSD card for my R4DS, and it is currently holding 42 games. REMEMBER! Not all games are the same size. Some games are as small as 4MB, while others can reach around 128MB! If you feel that you could use some extra room for games on your R4, check out the trimming section at the end of this guide (coming soon).

NDS Games:
NDS games have the “.nds” file extension. To install these games, just copy and paste them from your computer to the MicroSD card (root directory works just fine, or for organization’s sake, you can put the games into folders). When you boot your R4 and click the “Play Games” button, any games you copied to your card will now show up, as well as any folders you created. Simply select the game you want to play, and hit the “A” button. If this is the first time you have played that particular game, a prompt will ask you to create a save file. Just hit “A” again to continue (you won’t be asked again).

MAJOR NOTE: Some games do not have full compatibility with the R4DS. What does this mean for you? It means that some games won’t run, some games will run slow, and others don’t work with the Nintendo WiFi. To see the problem-some games, refer back to the R4 compatibility list: Compatibility List
But don’t worry, because 99% of the games will work just fine.

Quote:
I am considering buying a modchip (R4DS or M3) to try playing imports. So, my question, are NDS games Region-free? -Tousdan


Yes, absolutely. You can play games from any country as they are all region free.

DPG Videos:
DPG is a special video format that your NDS can handle with the help of moonshell. You can convert your own videos into DPG format using a free program called “BatchDPG”. Find a video tutorial somewhere else if this interests you.

You can also download DPG format videos from some online communities. People share their converted media to slackers like you =) If this is the path you choose, I suggest the forums at http://gbatmw.net/. (You have to register, but it’s free).

To run these videos, copy and paste them on to your MicroSD card. The root directory will work, but you can also place all your videos into a separate folder for organizational reasons. Create a new folder in your root directory (any name will do, but I suggest “VIDEOS”), and place all your DPG videos into this folder. When R4 boots up, select the second option “Play Media”, and moonshell will load. Once moonshell is loaded, you can navigate to your videos, and play them!

MP3s:
Similar to playing videos…
Copy and Paste MP3s from your PC to a desired location on your MicroSD card. You can create an “Audio” folder if you like.

Boot up moonshell (second option at the welcome screen), navigate to your MP3s, and play them!

Quote:
How’s the sound quality when playing MP3’s on the R4DS? -Nyall2007


MP3 quality is perfect! The NDS speakers suck though. Grab some nice headphones/earbuds, and you’ll be very pleased.

TXT Files:
You can read TXT files on your DS using moonshell. The method is identical to the videos and the mp3s above.

Homebrew:
Homebrew is something that you may hear about when talking about the R4DS. Homebrew applications are programs/scripts that have been created by the Nintendo DS fans (not by the game companies or Nintendo). Often times, Homebrew applications are simple utilities, however, there exist some complex software and game that may further enhance your DS experience. The most popular Homebrew programs are the emulators. Emulators allow you to play games from older systems, such as the Sega Genesis, Nintendo, Super Nintendo, and even the C64/Amiga.

The downer about NDS Homebrew is that it has very poor compatibility with Slot-1 Devices such as the R4. You can check out some of the Homebrew on our infamous Compatibility List. You’ll come across things such as “DLDI” patching, which may confuse you. Perhaps someone will create a specialized Homebrew guide to touch on these topics with a little more depth.

REMEMBER – Kernel updates fix compatibility, so some homebrew will only work if you are running the newest R4 version.

Ultimately, when it comes to Homebrew (and emulation), Slot-2 devices work with much more success.

Quote:
Hey Can you play gba roms on the R4. mine has 1.10 firmware on it. cheers. -blitz7287


Most simple and direct answer is, NO. Get a slot-2 device if GBA is important to you. But who knows. Things may change, and compatibility may be possible in the future.

Anything else cool?
R4 Functionality – A couple things worth pointing out about the R4 interface is the fact that you can change the LCD brightness in the main menu by tapping on the sun icon (top left), or by hitting the left trigger. You may also notice a little red or green “R” in the top right corner. This is called the “soft reset”. When activate (green) you can press (L+R+A+B+X+Y) while playing a game to reset back to the R4 menu.

Cheats – Another cool feature (found in the newer versions of R4) is the built in cheats. You’ll notice that many games will allow you to enter cheats from the R4 menu. Quite nifty if that sort of thing interests you.

Skins – The R4 is also skinnable (newer versions only). You’ll notice in the “_system_” folder that there exists a “themes” directory. You can replace the existing themes with skins of your own!
Google around and you can find some R4 skin sites such as: This One.
You can have 12 different themes at once. You cycle through the themes at the R4 welcome screen by hitting the select button. I highly suggest checking out some cool skins!

Rom Trimming – If you have ever purchased memory, or looked at the size of your NDS backups. you’ve probably noticed that you can only have sizes in increments of 16Mb, such as 128Mb, 256Mb, 512Mb and 1Gb etc. Because of this, say for example, a game was 300Mb., the game producers would be forced to put it on a 512MB cart. So what about that extra 212Mb? They fill it with fluff! Information the game doesn’t need to run! By removing this fluff, you can make room for more games!

This requires a tool called a ROM Trimmer.
You can download it from R4’s website: R4DS Trimmer Download and Guide.

This utility is a straight forward use. There should be no confusion. You select the game you want to trim as the “input filename”, and the destination and name of your desired trimmed ROM in the “output filename”. [Note – The output name will automatically be assigned when you select an input file, but you can change it to whatever filename you desire.] Follow the instruction on the download page and you should be just fine. If this process is too slow for you, you can find batch trimmers online, which will trim all your games at once.

If you trim your ROMs with an older version of the trimmer, there is a chance that you will disable the download-play for that ROM. Make sure you trim with the newest ROM-trimmer available.

Previously I stated that I fit 42 games on my 2GB MicroSD card. All these games were trimmed!


What advantages does the R4 have on other flashcarts?


Because the R4 is identical to the M3 Simply, there is no important differences between the two.

The difference between the R4 and any Slot-2 (GBA) device is outlined a little bit in the guide. Pretty much, Slot-2 devices have better homebrew and rom compatibility. Most of them also supply expanded memory for the DS, which means you can use the Opera browser. A huge downside for the Slot-2 devices is their price–they can be nearly twice the cost of the R4.

As far as the other Slot-1 devices, there could be noticeable differences, depending on what the cart is used for. A good example would be the newer “Cyclone-DS” cart. Although I haven’t tried it yet, the compatibility for Wifi/Download play and Homebrew/ROMS is much better. There are also few interface tweaks that give the Cyclone-DS an edge over the R4. The last advantage to the Cyclone-DS is that is is supposed to work flawlessly with any MicroSD card, with no slow-down or freezing. However, the Cyclone-DS is more expensive, so if you are planning on just playing DS-games/music/videos, the R4 is better for the money.

There also exist a few less-advertised brands of NDS carts, such as the Fireline, Mk5, DS-Linker, N-Card, and Express Card. These carts are much cheaper if you can find them online. You’ll have to do some research on the topic. The reason I chose the R4 over these other brands is because support for the R4 is readily available on many forums, including Black-cats and the official R4 page. This support is available because of the popularity of the carts. (For example, I would be able to help you with any R4 problems, but not with your Fireline problems).

Also, the last thing to look for is internal vs. external storage. There are Slot-1 cards that have internal memory instead of the expandable MicroSD storage. They can usually be purchased for cheaper than the R4 + respective MicroSD card, but if the memory chip were to die, you are tough out of luck. Another disadvantage to internal memory is you can’t just swap out cards like you can with a MicroSD card. I like to have a couple of MicroSD cards so that I can use one just for movies, another just for games, and a third just for music. Internal memory doesn’t have this flexibility, but again the utility vs. price will depend on what you are planning on using the cart for. Also, because the removable storage is MicroSD, it links up real well with a CPU through USB. This is not always the case with internal memory carts.

When setting up the card, do you just copy /paste the files exactly how they are after you extract them, onto the sdcard?

Or do you take the files out of the folders, and then copy/paste onto the sdcard?


Each game only consists of one .NDS file. Some of the ROMs are compressed under two different formats, so you may need to extract the same game twice. Once you have the “GameName”.NDS extracted on your computer, you just need to copy/paste it on to your card.

Also, some ROMs are tagged with (U),(E),(J), etc… This is the language the ROM is in (US, English, Japanese…etc..(respectively). So if one of the compressed ROMs has more than one .NDS file, just pick the one for your language preference.


Also, do you need to DLDI PATCH?


DLDI patching is only for homebrew. Ignore it for playing DS games.

Also, when you delete a rom, does it automatically delete the save file with it? Or do you have to delete it manually?


When you delete the ROM (.NDS file), it does not automatically delete the 0.5MB save file (.SAV). You have to delete both. (NOTE – The .SAV file is the file you would want to copy/paste on to your PC to backup a saved game.)

Are there any down-sides to trimming roms? Does it ever effect game play or “break” a rom?


Most common ones are over-trim (ROM doesn’t work when trimmed, or freezes at certain places), Multiplayer and Download-and-play doesn’t function.

Thats all I can think of at this point. You should always keep an untrimmed version of the rom in case you ever need it.

But what I meant when setting up the card, was the first initial setup, or updating of firmware.
Do you just copy what you get after you extract, to the root of the card? Or do you have to take all the files out of their folders, then drag the files to the root?


This is taken directly from the guide:

Copy and paste the files (2 folders and 2 files) from the CD/RAR-file into the root directory of your MicroSD card. You should now have the two folders (“_system_” and “moonshl”) and the two files (“_DS_MENU.DAT” and “_DS_MSHL.nds”) on your MicroSD card.

So the root of your directory should contain:
FOLDER: _system_
FOLDER: moonshl
FILE: _DS_MENU.DAT
FILE: _DS_MSHL.nds

If that’s what you have, then you’re good to go. Two two folders will contain files within them, but just keep them where they are.


so to update the firmware of r4 all you do is go to r4 site and download it
delete folders _system_ and moonshi
as well as ds menu and ds mhl
and replace them with the new? (is that right?)


Correct!
Remember, if you have any skins, you’re not going to want to delete/copy over them.

One thing I’d like to know is this: would I still be able to use my SC Lite to play GBA games – with the R4 acting as a PassMe? (Actually, would I even need PassMe functionality for GBA games on a slot-2 device?)

If so would I be able to link the two together? I’m thinking specifically of the Pokmon games which will interact with a Pokmon GBA cart in slot-2; could I put a Pokmon GBA ROM on the SC Lite in slot-2 and have Diamond/Pearl on the slot-1 R4 recognise the GBA ROM as if it were a real Pokmon GBA cart?

The two will work together, but I don’t know if you can have them both loaded at the same time (for your pokemon scenario).

Isn’t there an in-game button command that takes you back to the R4 menu if you’re playing a DS game or homebrew? I could have sworn there was but I couldn’t figure it out after trying for a couple minutes.

Also, are there any other in-game button commands for the R4 that should be mentioned?


R4 Functionality – A couple things worth pointing out about the R4 interface is the fact that you can change the LCD brightness in the main menu by tapping on the sun icon (top left), or by hitting the left trigger. You may also notice a little red or green “R” in the top right corner. This is called the “soft reset”. When activate (green) you can press (L+R+A+B+X+Y) while playing a game to reset back to the R4 menu.


Hopefully this will make things easier for those folks who arent too DS savvy.
Standard
Uncategorized

List of Upload Sites

http://file2you.net/ – Max file size Unlimited + FTP
http://www.up-file.com/ – Max file size Unlimited
http://www.ihud.com/ – Max file size Unlimited
http://www.uber-upload.net/ – Max file size 2GB\’s
http://www.megashares.com/ – Max file size 1.5GB\’s
http://getfile.biz/upload/ – Max file size 50MB\’s to 1GB + FTP
http://www.sendspace.com/ – Max file upload 1GB
http://www.dropboks.com/ – Max file size 1GB | Great interface
http://www.4shared.com/ – Max file size 1GB
http://www.transferbigfiles.com/ Max file size 1GB
http://www.oxyshare.com/ – Max file size 700MB\’s
http://www.zupload.com/ – Max file size 500MB\’s
http://www.spread-it.com/ – Max file size 500MB\’s
http://www.mooload.com/new/ – Max file size 500MB\’s
http://www.flyupload.com/ – Max file size 500MB\’s
http://mooload.com/new/upload/upload.php – Max file size 500MB\’s
http://www.filefactory.com/ – Max file size 300MB\’s
http://www.rapidupload.com/ – Max file size 300MB\’s
http://sharebigfile.com/ – Max file size 300MB\’s
http://www.openupload.com/ – Max file size 250MB\’s
http://www.theupload.com/ – Max file size 200MB\’s
http://uploadr.com/ – Max file size 150MB\’s
http://ez-files.net/ – Max file size 100MB\’s
http://www.content-type.com/ – Max file size 100MB\’s
http://www.mailbigfile.com/ – Max file size 100MB\’s
http://www.mediafire.com/ – Max file size 100MB\’s per file
http://www.files.to/ – Max file size 100MB\’s
http://www.justupit.com/ – Max file size 100MB\’s
http://www.easy-share.com/ – Max file size 100MB\’s
http://www.fileupyours.com/ – Max file size 100MB\’s |\”Never expires\”
http://www.jagbox.com/ – Max file size 100MB\’s
http://www.yousendit.com/ – Max file size 100MB\’s
http://uploadhut.com/ – Max file size 50MB\’s
http://www.mytempdir.com/ – Max file sixe 50MB\’s
http://www.ripway.com/ – Max file size 30MB\’s | Files never get deleted
http://www.speedyshare.com/ – Max file size 24MB\’s | Login for 480MB\’s


Images:
http://www.tinypic.com/
http://www.pictiger.com/
http://www.imagebeaver.com/ | Great for muti images
http://www.30sixpics.com/
http://www.hostpic.biz/

Since you all liked \’em I put a few more and two that said unlimited file size.. o_o


More By y

Hostings Without ads

++http://www.liquid2k.com/ (recommended)
++http://www.brinkster.com/ (recommended)
++http://www.demented.org/
++http://www.cfm-resources.com/
++http://www.digitalrice.com/

Host support PHP, 15-25 MB, MySQL, Some Ads

++http://www.host.sk/ (no-ads)
++http://www.php50.com/ (pop-up)
++http://www.t35.com/ (pop-up)
++http://www.clawz.com/ (banner)
++http://www.tripod.co.uk/ (pop-up, MySQL included)

Large Host for files and FTP

++http://www.freewebsites.com/
++http://www.gizba.com/
++http://www.webavenue.org/
++http://www.hut.ru/
++http://www.web1000.com/
++http://www.phidji.com/ (100MB, no ads, ASP)
++http://www.spacetowns.com ( 50 MB, no ad\’s )
++http://www.freecoolpages.com ( 50 MB, PHP4 )
++http://www.topcities.com ( 150MB )
++http://www.nerocities.com ( 100MB, FTP, no ad\’s )
++http://www.Topzite.com ( 1000MB, FTP, no ad\’s, CGI )
++http://www.tripod.cọuk ( 100MB, ad\’s )
++http://www.mystigall.com/ (75MB, no ads, FTP, CGI)
++http://www.webazn.net/ (50MB, no Ads)

Host Some ads, small MB

++http://www.enjetek.com ( 15MB )
++http://www.f2g.net ( 15MB, FTP, no ads, PHP4 )
++http://www.geocities.com/
++http://www.angelfire.com/
++http://www.tripod.com/
++http://www.topcities.com/

Host Support CGI for Ikonboard and YaBB, FTP

++http://www.brinkster.com/ (no FTP, and no ads)
++http://www.raketnet.nl/
++http://www.cfm-resources.com/
++http://www.aspfreeserver.com/
++http://www.websamba.com/

Host >15MB, transfer 1GB/month, PHP, MySQL, CGI

++http://www.port5.com ( 15MB, FTP, no ad\’s )
++http://www.amzweb.net/signup.php (also offers ASP)
++http://www.spaceports.com/
++http://www.digitalrice.com/ (only 5 MB space)
++http://www.portland.cọuk/ (only 100 MB transfer)

Host 20-30MB, PHP, MySQL, FTP

++http://www.host.sk/ (no ads)
++http://www.spaceports.com/
++http://www.tripod.co.uk/
++http://www.multimania.com/
++http://www.amzweb.net/signup.php
++http://www.web1000.com/ (use at your own risk! vious2)
++http://youthofamerica.org/ (20MB, browser noads RealVideo RealAudio POP Email ASP SSI CGI-BIN)
++http://www.t35.com ( 35MB, FTP, no ad\’s )

Host > 20MB , transfer unlimited, FTP

++http://www.webavenue.org/ (no ads)
++http://www.ghs20.com/ (no ads)
++http://www.host.sk/ (no ads)
++http://www.amzweb.net/signup.php
++http://www.netfirms.com/
++http://www.fateback.com/
++http://www.barrysworld.com/ (35MB, no ads, fast, PHP)

~~~Free BulletinBoards/Forums

++http://www.phpbb.com – phpBB2 (PHP, mySQL)
++http://woltlab.de – wbb1 (PHP, mySQL)
++http://yabb.info – YaBB SE (PHP, mySQL)
++http://openbb.com – OpenBB2 (PHP,mySQL)
++http://www.invisionboard.com – Ibforums (PHP,mySQL AND CGI)
++http://forum.snitz.com Snitz Forum2000 (ASP)
++http://german-bulletin-board.de – gBB (PHP, mySQL) (Cool)
++http://www.phorum.org/ – Phorum (PHP + MySQL; open source)
++http://www.xmbforum.com/ – XMB (PHP + MySQL)
++http://www.minibb.net/ – MiniBB (PHP + MySQL)
++http://www.yabb.com/- YaBB original (CGI)
++http://www.mybboard.com/ – MyBB/DevBB (PHP, MySQL)
++http://www.xmbforum.com/ – XMB (PHP, mySQL
++http://www.simplemessageboard.com/ – SMP (CFM, MSsql)
++http://www.lokwa.com/ – lokwaBB (PHP, Mysql)
++http://www.mercuryboard.com/ – MurcuryBoard (PHP, MySQL)
++http://edge-programming.com/eboard/ – EBoard (PHP)
++http://www.smartbb.net/ – SmartBB (PHP, Mysql)
++http://www.icredibb.com/ – iBB (PHP, Mysql)
++http://www.myboard.co.uk/ – myBoard (PHP, MySQL)
++http://mybboard.com – DevBB (PHP, mysql)
++http://www.versiforum.com – VersiForum (ASP)


~~~Free Remotly Hosted Forums

++http://upperboard.com/
++http://forums.asp-dev.co.uk/
++http://www.xsorbit.com/
++http://www.proboards.com/
++http://www.ezboard.com/
++http://forums.hostultra.com/
++http://www.network54.com/
++http://www.everyone.net/
++http://www.mycool.com
++http://www.guestforum.com/
++http://www.voy.com/
++http://www.dk3.com/
++http://www.homepagetools.com/ultraboard
++http://www.swiftsolution.com/
++http://groups.yahoo.com/
++http://communities.msn.com/
++http://on.starblvd.net/meet
++http://forums.delphi.com/
++http://www.suddenlaunch.com/
++http://bb.bbboy.net/
++http://www.eboards4all.com/

~~~Free Subdomains

++www.freeurl.com
++www.jwdx.com
++www.cjb.net
++www.dot.tk
++www.v3.com
++www.hotredirect.com
++www.internetjump.com
++www.explode.to
++www.zdos.com
++www.webalias.com
++www.reduce.to
++www.warping.to
++www.gosurfto.com
++www.2000c.net
++www.shorturl.com
++www.has.it
++www.doze.to
++www.nigx.net
++www.1fx.net
++www.soar.to
++www.123redirect.com
++www.ipfox.com
++www.webweaver.nu
++www.ohgo.com
++www.url-redirection.org
++www.aliasnames.com
++www.get-2.com
++www.myredirector.com
++www.dot.nu
++www.tr.cx
++www.kickme.to
++www.rapworld.com/url/
++www.dk3.com
++www.xiy.net
++www.url.animeumbrella.com
++www.suite.net/url.htm
++www.surftohere.com
++www.israd.net
++www.ontheweb.nu
++www.globalredirect.com
++www.flash.to
++www.zooming.to
++www.emu.vg
++www.linkworld.to
++www.rename.net
++www.url4life.com
++www.n2v.net
++www.nethop.com
++www.webmask.com
++www.heroffice.com
++www.crcpl.tsx.org
++www.guruguru.to
++www.iscool.net
++www.dkanet.com
++www.r67.com
++www.uni.cc
++www.fr.fm
++www.d.bz
++www.e33.de
++www.de.vu
++www.dd.vu
++www.6x.to
++www.b4.to
++www.b6.to
++www.h3.to
++www.thx.to
++www.rox.to
++www.faster.as
++www.hop2.de
++www.tsx.to
++www.tsx.org
++www.bootme.to
++www.2fbi.de
++www.ubb.cc
++www.IDz.net
++http://zwap.to
++www.xsub.ws
++www.2b.to
++www.elite.to
++www.2fbi.de
++www.suckz.de
++www.b6.to
++www.quickurl.com
++http://www.9cy.net/myred/signup.php

~~~Free Domains

++http://www.dot.tk/ (redirection)
++http://www.uni.cc/ (redirection, webhosting, OR domain)
++http://www.ripn.net:8080/en/ (domain)
++www.dhs.org
++http://www.acidmist.com/
++http://www.1millionfreedomains.com/ (requires reserve fee)

~~~Co-Brands

++http://megagiga.com
++http://portland.co.uk
++http://www.communityarchitect.com/
++http://www.muttle.com/

~~~Free FileStorage

++http://java.isavvix.com/freeback.jsp
++http://www.myplay.com/
++http://www.sharemation.com/
++http://www.staroffice.com/
++http://www.storagevault.net/
++http://www.tiomeg.com/
++http://briefcase.yahoo.com/
++http://www.zden.com/Signup.asp?ID=136463

~~~Free Pop3Mails

++http://mail.uni.de
++http://quickemail.de
++http://gmx.net
++http://mypad.com
++http://kgb.cz
++http://amexmail.com
++http://freemail.web.de
++http://hotmail.com (not sure)
++http://uyeler.mynet.com
++http://eng.mail.port.ru
++http://passagen.se
++http://cjb.net
++http://myrealbox.com
++http://mail.urbia.de
++http://my-mail.ch
++http://westonline.com
++http://mundomail.net
++http://www.hotpop.com
++http://webmail.berlin.de
++http://club.lemonde.fr
++http://emailcity.de
++http://mail.lycos.co.uk
++http://epost.de
++http://schondrin.de
++http://freemail.nl
++http://idlo.de
++http://saintmail.net
++http://topsurf.com
++http://uk2.net
++http://liquid2k.com
++http://dostmail.com
++http://china.com
++http://hotpop.com
++http://newmail.net
++http://mail.arabia.com
++http://mail.ofir.dk
++http://home.se
++http://epost.portalen.no
++http://runbox.com
++http://mail.tut.by

~~~Free Email for your site

++http://bigmailbox.com
++http://zzn.com
++http://i-p.com
++http://oemmail.com

~~~Free Counters/Stats for ur site

++www.sitemeter.com
++http://www.addfreestats.com
++www.bravenet.com
++www.admo.net
++www.thecounter.com
++http://www.extreme-dm.com/
++http://www.nedstat.com/
++www.stats4all.com
++www.realtracker.com
++http://www.analogstats.com
++http://www.geocounter.net
++www.webtrendslive.com
++http://www.okcounter.com
++http://www.vioclicks.com


++www.fr33space.com list of free webhosting companies ads or without ads

http://www.crosswinds.net
http://www.httpcity.com
friendpages.com
http://uka.ru
http://www.3hosting.info
.SexRu.net
http://www.ladies.com
MiPlay.com
http://www.ibackup.org
http://www.takeinet.com
http://www.free.fr
http://www.expage.com
http://www.brinkster.com
http://www.front.ru http://www.netfirms.com http://www.freediskspace.com http://www.youreallycan.com/smartage/ http://www.XOOM.com/webspace
http://zor.org/
http://www.ulimit.com
http://www.zone.ee
http://www.hot.ee
http://www.lycos.at/
http://www.lycos.be/
http://www.jubii.dk/
http://www.lycos.fr/
http://www.lycos.de/
http://www.lycos.it/
http://www.lycos.nl/
http://www.spray.se/
http://www.lycos.ch/
http://www.lycos.es/
http://www.lycos.ru/
http://www-english.lycos.com/
http://espanol.lycos.com/
http://www.lycosasia.com/
http://www.your-name.us.tt
http://www.your-name.uk.tt
http://www.your-name.ca.tt
http://www.your-name.eu.tt
http://www.your-name.es.tt
http://www.your-name.fr.tt
http://www.your-name.it.tt
http://www.your-name.se.tt
http://www.your-name.dk.tt
http://www.your-name.be.tt
http://www.your-name.de.tt
http://www.your-name.at.tt
http://www.your-name.au.tt
http://u9.ru
http://1e.ru
http://Narod.ru
http://hut.ru
http://chat.ru
http://zmail.ru
http://hotbox.ru
http://fatal.ru
http://boom.ru
http://by.ru
http://ussr.to
http://www.netfirms.com
http://hostmos.ru
http://rdcom.ru
http://webm.ru
http://www.mail15.com
http://www.0catch.com/
http://50free.com
http://www.free-webhosts.com/
http://www.webhosts4free.com/
http://www.100-best-free-webspace.com/
http://www.thefreesite.com/FreeWebSpace/


File Hosting

http://fileupyours.com
Everything unlimited

http://datapickup.com
Max File Size: 1.5GB
File deleted after 7 days

http://freespace.filefront.com
Max File Size: 1GB (Files cannot be larger than 1GB or take more than 10 hours to upload)
Everything else is unlimited.

http://www.yousendit.com
Max File Size: 1GB
File deleted after 7 days

http://www.transferbigfiles.com
Max File Size: 1GB
File deleted after 5 days/20 downloads

http://www.spread-it.com
Max File Size: 500MB
File deleted if not downloaded for 30 days

http://ftpz.us
Max File Size: 498MB
Everything else is unlimited

http://www.thefilehut.com
Max File Size: 250MB
Free registration required

http://www.megaupload.com
Max File Size: 250MB (used to be 500MB)
File deleted if not downloaded for 30 days

http://www.updownloadserver.com
Max File Size: 250MB (Uploads will be checked by an admin before publishing)

http://www.sharebigfile.com
Max File Size: 250MB
File deleted after 7 days

http://www. uploadr.com
Max File Size: 150mb weekdays, 300mb weekends
File deleted 1 week after last download date.

http://www.filecache.de
Max File Size: 125MB
File deleted if not downloaded for 30 days

http://www.pushfile.net
Max File Size: 100MB
File deleted if not downloaded for 7 days

http://www.dropload.com
Max File Size: 100MB
File deleted after 7 days or after the first download (yep.. it\’s true)

http://www.turboupload.com
Max File Size: 70MB

http://www.picapic.net
Max File Size: 60MB

http://www.nexmicrosystems.com
Max File Size: 60MB
File deleted after 30 days

http://www.savefile.com
Max File Size: 60MB
File deleted if not downloaded for 14 or 30 days. FAQ says 14, upload page says 30…

http://www.psychohost.com
Max File Size: 50MB
Everything else unlimited.

http://www.freeuploader.com
Max File Size: 50MB

http://www.ushareit.com
Max File Size: 50MB

http://sharefiles.ru
Max File Size: 50MB
File deleted after 30 days

http://www.wirefiles.com
Max File Size: 50MB

http://www.xshare.us
Max File Size: 50MB

http://app02.bonpoo.com/file.htm
Max File Size: 50MB

http://rapidshare.de
Max File size: 50MB
Download Limit: 50MB/hour
File deleted if not downloaded for 30 days

http://www.uploadhut.com
Max File Size: 50MB

http://www.gigashare.com
Max File Size: 50MB (multiple files upload option)

http://illhostit.com
Max File Size: 40MB

http://www.filebuffer.net
Max File Size: 40MB
Everything else seems to be unlimited

Standard
Tips

How to fix the ‘Duplicate Headers’ error

I’ve seen some people asking about the ‘Duplicate Headers’ error. This error occurs when a torrent file name has a comma in it. It shows up as ERR_RESPONSE_HEADERS_MULTIPLE_CONTENT_DISPOSITION

Here is the fix, using the ‘Kevin Sullivan, Oliver Humperdink And Mark Lewin RF Video Darkside Resurrected Shoot’ torrent on XWTC as an example:

When you click download and it goes to the error page, go into your browser bar, and delete the ‘C’ that comes after the ‘2’ after Kevin Sullivan’s name. Then hit enter, and the torrent file will download.

Basically the ‘C’ represents the comma. Don’t worry about the ‘%’ and other various symbols.

By not putting commas in torrent file names, this error is avoided.

Standard
Tips

Torrent Client Errors Guide

There are no users to connect to.
Leave your torrent open and maybe the bittorrent client will connect (it may take some time).

windows cannot find “c:documents and settings…

Windows couldnt find the torrent file
Right click on the torrent link and save it to your hard-drive, then open the torrent that is in your hard-drive by double clicking on it.

No space left on device

The client tried to allocate the space for the file on your HD, you get this error when you dont have enough space to fully allocate the file.
Choose another location for the file and try again

urlopen error – (7, ‘getaddrinfo failed’)

The tracker is overloaded
Keep the torrent window open and wait.

temporary internet files content 1.5 xxx don’t exist

XP compresses temp internet files once it reach a certain # of files or 1/2 alloted space that is what causes the error
Either download the torrent to your hd and launch it from there.. or clear out your temp internet files.

problem getting response info – [errno2] No such file or directory

The directory of C:/ is probably causing your problems, it’s most likely a temporary directory that Internet Explorer uses when you left click on the torrent file.
Right click on the .torrent and select “save target as”. Then save the .torrent file to a directory on your drive.

(IOError – [Errno13] Permission denied)

If you start more than one bittorrent gui (the same torrent) it will give you permission denied
Go to Task manager and close down all bt-gui processes.

rejected by tracker – Your IP is not registered to use this tracker for this file

Probably the tracker is overloaded, so the owner decide to only allow certain IPs to use the tracker.
Leave your client open and it will eventually connect

Problem connecting to tracker: HTTP Error -1

Leave your torrent running in your client. The client will keep checking the tracker and it should resume eventually.

Problem connecting with tracker – (10060, ‘Operation timed out’)

The server/tracker is down or too busy to process your request.
Just keep trying – leave it open.

Just leave your torrent running in your client. The client will keep trying to connect to the tracker.

Problem connecting to tracker –

A lot of routes in your routing table (due to a misconfigured router, or misconfigured default route)

Lots of stale connections in your connection table

A lot of data that is pending for sending or receiving on a current connection(s), which can’t be sent or received for some reason.

Opening too many sockets at the same time.

Probably don’t have enough free space on your hard drive.

‘Problem connecting to tracker. HTTP error 503: service unavailable’

The tracker is down for a rest or something bad happened.
Leave the client open, it will continue trying to connect.

Problem getting response info – [Errno 2] No such file or directory: “Cocuments and Sett…”

IE sometimes doesn’t save the torrent file in the Temp Internet Files directory properly.
Right click on the link and choose Save As…, and save the torrent file to disk, and then click the file to launch the client.
Clearing the IE cache seems to help if this problem is recurring.

A piece failed hash check, re-downloading it

Means that you received a piece of the file that didn’t check out as being correct, so it will be downloaded again.
Ignore the error, the client will automatically re-download it.

bad data from tracker –

seems to happen when the tracker is overloaded or otherwise flaky.
Safe to ignore this error.

Problem connecting to tracker – timeout exceeded
Problem connecting to tracker – HTTP Error 503: Connect failed
Problem connecting to tracker – (111, ‘Connection refused’)

There was a problem contacting the tracker. Trackers tend to be heavily loaded, and connections sometimes fail.
Just be patient and leave the client open.

Problem connecting to tracker – HTTP Error 400: Not Authorized

The administrators of this tracker are not allowing it to be used for this torrent.
Try going to the web site associated with the tracker and see if you can find an updated torrent.

Problem connecting to tracker – HTTP Error 404: Not Found

Probably a stale torrent.
Try to find a new link to the torrent.

Problem connecting to tracker – HTTP Error 407: Proxy Authentication Required

You may need to configure a username and password in order to contact the tracker.

Couldn’t listen – (48, ‘Address already in use’)

Some other program is already using the port BitTorrent wants to bind to.
Check the ports on your other clients.

Problem connecting to tracker = (10054, ‘Connection reset by peer’)

This error occurs when the only peer you are downloading from disconnects from BitTorrent.
Your client will still attempt to find other hosts to continue your download from.

Trouble accessing files – Errno 24 (Too many open files)

Client keeps all the files being downloaded open which exceedes the OS limit.
Limit the number of concurrent downloads at any one time.

Connection refused

#This usually means that the tracker is either busy (full listen queue) or dead. If it is just busy try increasing the number of query retries. I’ve seen some super busy trackers refuse hundreds of queries before finally answering.
If you get a dozen or so refused connections in a row, wait a while and try again. If it persists over a few hours, maybe the tracker is dead.

connect: timeout

The tracker is probably too busy.
Same advice as for Connection refused.

null reply

The tracker may be hosed.
Try again later.

BT::Bencode::decode Error (at position: 0)

The tracker did not properly return a bencoded result so it apparently does not implement scraping. This usually happens when HTML is returned instead of a bencoded result.

Bad Request/403 Forbidden/404 Not Found

This tracker probably does not implement scraping.
Check with the tracker administrator.

[Failure Reason: Invalid info hash value.]

This tracker probably does not implement scraping.
Check with the tracker administrator.

Standard
Tutorials

Great tips to improve network settings

If your network doesn’t give the speed you want then follow these great tips to improve network settings

The speed of your network connection doesn’t just depend on the speed of your hardware. Windows is an operating system that is designed to work on a variety of different hardware and network setups. Because of the abstract nature of the operating system, it cannot be optimized for user-specific hardware setups.

Depending on the type of network connection you have, you might be able to tweak your connection so that the speed of your Internet, as well as your local area network, will be faster. By hacking the System Registry and editing the TCP/IP parameters, you can fine-tune the values to take advantage of more reliable, faster Internet connections, such as DSL and cable.

These next sections will guide you through the steps of increasing both the speed of your local area network and your Internet connection.

Does your computer slow down when you browse your local area network and connect to other computers that are sharing data? One of the most common causes of this slowdown is a feature of Windows Explorer that looks for scheduled tasks on remote computers. This effort can take some time on some computers and can really slow down your browsing. The window with which you are browsing the network may appear to freeze momentarily, as the system is waiting for a response from the remote computer.

Although this problem is a complex one, the solution is very simple. Instead of having to wait for the remote scheduled tasks, which is useless information to anyone who is not a system administrator remotely configuring scheduled tasks, you can disable this feature.

In order to do this, you will have to hack the System Registry and delete a reference to a key so that this feature will not be loaded. To do this, follow these steps:

1. Open up the Registry Editor by clicking the Start Menu and selecting Run. Then type regedit in the text box and click the OK button.
2. Once the Registry Editor has loaded, expand the HKEY_LOCAL_MACHINE key.
3. Next, expand Software and then m*cro$oft.
4. Locate Windows and expand that as well.
5. You will want to be editing the main system files, so expand CurrentVersion.
6. Because this feature is a feature of the Windows component known as Explorer, expand the Explorer key.
7. Next, you will want to modify the remote computer settings, so expand the RemoteComputer key and then expand the NameSpace key to show all of the features that are enabled when you browse to a remote computer.
8. In the NameSpace folder you will find two entries. One is “{2227A280-3AEA-1069-A2DE-08002B30309D}” which tells Explorer to show printers shared on the remote machine. The other, “{D6277990-4C6A-11CF-8D87-00AA0060F5BF},” tells Explorer to show remote scheduled tasks. This is the one that you should delete. This can be done by right-clicking the name of the key and selecting Delete.

Tip:
If you have no use for viewing remote shared printers and are really only interested in shared files, consider deleting the printers key, “{2227A280-3AEA-1069-A2DE-08002B30309D}”, as well. This will also boost your browsing speed.

Note : This is no COPY-PASTE work done from anywhere but just a share of my past knowledge:smile:

Standard
Converting

Video Types Explained, and what to use to play em’

This is a guide (really a video type dictionary) that explains almost every single video type on the Internet and everything you will run into while torrenting….

You will always run into other weird formats you have never seen before and be like WTH how do i play this….Usually VLC and The K-Lite Codec Pack will help you play all the formats i am about to mention. A link to them is in the 1st format which is the format you will probably see the most in your torrenting years.

Heres it goes!!!
__________________________________________________________

.AVI (Audio Video Interleave)

AVI is a video format from Microsoft. Currently it’s the most common file format for storing audio/video data on the PC. Also it’s a standard video format in the scene. AVI itself doesn’t specify how it should be encoded, so the audio/video can be stored in very various ways. The most commonly used video codecs that use the AVI structure are XViD and DiVX. AVI can be played by almost any video viewing program. When it’s coded with XViD or DiVX you’ll need to download the codec to view it. I prefer K-Lite Codec Pack which usually plays all formats I have ever thrown at it. But also VLC Media Player is a separate program that contains all the codecs with it so there doesn’t have to be any installation and all the codec and video settings are in the program> K-Lite and VLC

.DIVX

Old file format of .avi files encoded with the divx codec. See .AVI. you will rarely see these anymore and usually you can use VLC to play them..

.FLV and .SWF

FLV Files are really just flash files that you usually download of Youtube or other video clip sites. VLC can play these but they’re are other programs like FLV Player that can also play these. Do not get FLV’s mixed with .swf’s found at places like ebaumsworld.com. Usually you can save .SWF’s easily and just play them with your brower.

.MKV (Matroska Video)

A .mkv file is a very modern multimedia container file that contains one or more tracks, each of which store a particular type of data, such as audio, video, effects, or text (for subtitles, for example). The .mkv is unique because it supports almost any format, and it has advanced features, like: chapters, selectable subtitles/audio, stream able for Internet and menu’s. In the scene, this format is often used for high definition content, in combination with modern codecs like: x264 and h264. This is also pretty rare but you probably will see it in your lifetime especially if you like high-definition.

.MOV (MOVie)

A .mov file is an Apple Quicktime movie file. A .mov file functions as a multimedia container file that contains one or more tracks, each of which store a particular type of data, such as audio, video, effects, or text (for subtitles, for example). Each track in turn contains track media, either the digitally-encoded media stream (using a specific codec such as mp3, jpeg, divx) or a data reference to the media stored in another file or elsewhere on a network. I usually do not use .mov files because their quality is not super great, but you will see them especially with little clips and such. These can be played with Quicktime and VLC or K-lite.

.MP4 (MPEG Audio Layer-4)

MPEG-4 -encoded audio or video file, using MPEG-4’s container format. MP4 files can be played by alternative systems like Apple computers and iPod’s. These are usually found on PSP’s and Ipods but can be used to make very small files for other portable systems like Mobile Phones.

.MPG / MPEG

MPEG-1 or MPEG-2 -encoded video file. A video standard developed by MPEG Group. MPEG-2 is not a successor for MPEG-1, but an addition instead — both of these formats have their own purposes in life; MPEG-1 is meant for medium-bandwidth usage and MPEG-2 is meant for high-bandwidth/broadband usage. Most commonly MPEG-2 is used in digital TVs, DVD’s and SVCD’s. MPEG-1 is mostly found in KVCD’s and VCD’s and other small movie files.

.ratDVD

A .ratDVD file has been created with the software ratDVD. ratDVD can compress an entire DVD movie to one single file including menus with full functionality, all extras, all audio tracks, all angles and any other material on the disc. The result .ratDVD file is usually several gigabytes smaller, but the quality is not so good. Also, it’s packed and compressed a lot. These are extremely rare now and you will probably never come across one.

.VOB (Video Object File)

It is one of the core files found on DVD-Video discs and contains the actual movie data. Basically VOB file is just a basic MPEG-2 system stream, meaning that it is a file that contains multiplexed MPEG-2 video stream, audio streams (normally AC3 and DTS formats) and subtitle streams. Usually on a DVD there will be multiple .VOB files. If you ever want to rip the main movie from a DVD and put it on your computer as 1 file, i recommend using VOB2MPG.

.WMV (Windows Media Video)

WMV is a generic name of Microsoft’s video encoding solutions and doesn’t necessarily define the technology what it uses — since version 7 (WMV7) Microsoft has used its own flavor of MPEG-4 video encoding technology (not very surprising, it’s not compatible with other MPEG-4 technologies). DivX video format is originally based on hacked WMV codec. The latest versions of WMV don’t have much in common with MPEG-4 anymore, but use Microsoft’s own video encoding technologies instead. The only releases which are in .WMV format are ususlly porn clips (since you download them as .WMV from the web and don’t require a re-encode) and High-Quality Xbox vids.

.XVID

Old file format of .avi files encoded with the xvid codec. See .avi at the top of the page for more info.

Video File Container Formats

.ISO

An .iso file is a complete copy of a CD or DVD, stored into 1 file. The extension comes from the full name of the CD-ROM and DVD-ROM file system specification, ISO 9660. .ISO files are one of the two most standard file formats for image files in the scene. It can be burned to a CD/DVD or virtually mounted.
I recommend a program like PowerISO to handle ISO files by Viewing, Editing, Extracting, Mounting, and Burning ISO Files.

.IMG (Image)

An .img file is a complete copy of a cd or dvd, stored into 1 file. If it’s ripped with CloneCD
the .img file should also be accompanied by a .ccd and a .sub file. .IMG files are one of the two most standard file formats for image files in the scene. It can be burned to a CD/DVD or virtually mounted. I still recommend PowerISO for this sort of thing since it does support the handling of this format also. Meaning it can do all the same things with a .IMG as it can do with a .ISO.

.MDF

If it is a rather large file, e.g. 650 MB, then it is most likely a CD image. If it is a file bigger than 700MB then it is a DVD Image. These MDF image files are created using a CD/DVD CD/DVD image file editor (and CD burner and CD/DVD backup tool) called MagicISO. But also these can be burned and handled with PowerISO.

CAM –

A cam is a theater rip usually done with a digital video camera. A mini tripod is sometimes used, but a lot of the time this wont be possible, so the camera make shake. Also seating placement isn’t always idle, and it might be filmed from an angle. If cropped properly, this is hard to tell unless there’s text on the screen, but a lot of times these are left with triangular borders on the top and bottom of the screen. Sound is taken from the onboard microphone of the camera, and especially in comedies, laughter can often be heard during the film. Due to these factors picture and sound quality are usually quite poor, but sometimes we’re lucky, and the theater will be fairly empty and a fairly clear signal will be heard.

TELESYNC (TS) –

A telesync is the same spec as a CAM except it uses an external audio source (most likely an audio jack in the chair for hard of hearing people). A direct audio source does not ensure a good quality audio source, as a lot of background noise can interfere. A lot of the times a telesync is filmed in an empty cinema or from the projection booth with a professional camera, giving a better picture quality. Quality ranges drastically, check the sample before downloading the full release. A high percentage of Telesyncs are CAMs that have been mislabeled.

TELECINE (TC) –

A telecine machine copies the film digitally from the reels. Sound and picture should be very good, but due to the equipment involved and cost telecines are fairly uncommon. Generally the film will be in correct aspect ratio, although 4:3 telecines have existed. A great example is the JURASSIC PARK 3 TC done last year. TC should not be confused with TimeCode , which is a visible counter on screen throughout the film.

SCREENER (SCR) –

A pre VHS tape, sent to rental stores, and various other places for promotional use. A screener is supplied on a VHS tape, and is usually in a 4:3 (full screen) a/r, although letterboxed screeners are sometimes found. The main draw back is a “ticker” (a message that scrolls past at the bottom of the screen, with the copyright and anti-copy telephone number). Also, if the tape contains any serial numbers, or any other markings that could lead to the source of the tape, these will have to be blocked, usually with a black mark over the section. This is sometimes only for a few seconds, but unfortunately on some copies this will last for the entire film, and some can be quite big. Depending on the equipment used, screener quality can range from excellent if done from a MASTER copy, to very poor if done on an old VHS recorder thru poor capture equipment on a copied tape. Most screeners are transferred to VCD, but a few attempts at SVCD have occurred, some looking better than others.

DVD-SCREENER (DVDscr) –

Same premise as a screener, but transferred off a DVD. Usually letterbox , but without the extras that a DVD retail would contain. The ticker is not usually in the black bars, and will disrupt the viewing. If the ripper has any skill, a DVDscr should be very good. Usually transferred to SVCD or DivX/XviD.

DVDRip –

A copy of the final released DVD. If possible this is released PRE retail (for example, Star Wars episode 2) again, should be excellent quality. DVDrips are released in SVCD and DivX/XviD.

VHSRip –

Transferred off a retail VHS, mainly skating/sports videos and XXX releases.

TVRip –

TV episode that is either from Network (capped using digital cable/satellite boxes are preferable) or PRE-AIR from satellite feeds sending the program around to networks a few days earlier (do not contain “dogs” but sometimes have flickers etc) Some programs such as WWF Raw Is War contain extra parts, and the “dark matches” and camera/commentary tests are included on the rips. PDTV is capped from a digital TV PCI card, generally giving the best results, and groups tend to release in SVCD for these. VCD/SVCD/DivX/XviD rips are all supported by the TV scene.

WORKPRINT (WP) –

A workprint is a copy of the film that has not been finished. It can be missing scenes, music, and quality can range from excellent to very poor. Some WPs are very different from the final print (Men In Black is missing all the aliens, and has actors in their places) and others can contain extra scenes (Jay and Silent Bob) . WPs can be nice additions to the collection once a good quality final has been obtained.

DivX Re-Enc –

A DivX re-enc is a film that has been taken from its original VCD source, and re-encoded into a small DivX file. Most commonly found on file sharers, these are usually labeled something like Film.Name.Group(1of2) etc. Common groups are SMR and TND. These aren’t really worth downloading, unless you’re that unsure about a film u only want a 200mb copy of it. Generally avoid.

Formats

VCD –

VCD is an mpeg1 based format, with a constant bitrate of 1150kbit at a resolution of 352×240 (NTCS). VCDs are generally used for lower quality transfers (CAM/TS/TC/Screener(VHS)/TVrip(analogue) in order to make smaller file sizes, and fit as much on a single disc as possible. Both VCDs and SVCDs are timed in minutes, rather than MB, so when looking at an mpeg, it may appear larger than the disc capacity, and in reality u can fit 74min on a CDR74.

SVCD –

SVCD is an mpeg2 based (same as DVD) which allows variable bit-rates of up to 2500kbits at a resolution of 480×480 (NTSC) which is then decompressed into a 4:3 aspect ratio when played back. Due to the variable bit-rate, the length you can fit on a single CDR is not fixed, but generally between 35-60 Mins are the most common. To get a better SVCD encode using variable bit-rates, it is important to use multiple “passes”. this takes a lot longer, but the results are far clearer.

XVCD/XSVCD –

These are basically VCD/SVCD that don’t obey the “rules”. They are both capable of much higher resolutions and bit-rates, but it all depends on the player to whether the disc can be played. X(S)VCD are total non-standards, and are usually for home-ripping by people who don’t intend to release them.

DivX / XviD –

DivX is a format designed for multimedia platforms. It uses two codecs, one low motion, one high motion. most older films were encoded in low motion only, and they have problems with high motion too. A method known as SBC (Smart Bit-rate Control) was developed which switches codecs at the encoding stage, making a much better print. The format is Ana orphic and the bit-rate/resolution are interchangeable. The majority of PROPER DivX rips (not Re-Encs) are taken from DVDs, and generally up to 2hours in good quality is possible per disc. Various codecs exist, most popular being the original Divx3.11a and the new XviD codecs.

CVD –

CVD is a combination of VCD and SVCD formats, and is generally supported by a majority of DVD players. It supports MPEG2 bit-rates of SVCD, but uses a resolution of 352×480(ntsc) as the horizontal resolution is generally less important. Currently no groups release in CVD.

DVD-R –

Is the recordable DVD solution that seems to be the most popular (out of DVD-RAM, DVD-R and DVD+R). it holds 4.7gb of data per side, and double sided discs are available, so discs can hold nearly 10gb in some circumstances. SVCD mpeg2 images must be converted before they can be burnt to DVD-R and played successfully. DVD>DVDR copies are possible, but sometimes extras/languages have to be removed to stick within the available 4.7gb.

MiniDVD –

MiniDVD/cDVD is the same format as DVD but on a standard CDR/CDRW. Because of the high resolution/bit-rates, its only possible to fit about 18-21 mins of footage per disc, and the format is only compatible with a few players.

Standard
Tutorials

Installing uTorrent on a Leeware

Many people are lately thinking to take-up a seedbox to manage their ratios and ensure that they do not unnecessary get banned on the private sites.

So here is a guide to set up their Leeware boxes. This guide is intended for Leeware servers only, but it may work with other servers running RPM based distributions (aka distros) as well. Firstly, you need to get the following applications:

1.     Putty or any other SSH client
2.     FTP Client (with SFTP support) like CuteFTP, WinSCP, WS_FTP, etc.
3.     TightVNC or any other VNC Viewer

Now, follow instructions carefully.

1. Open up Putty. On the left tree, go to Session.

2. Under Hostname (or IP address) type your IP or hostname (i.e. vpsxxx.leeware.com)

3. Choose SSH (port 22)

4. Under Saved Sessions, type something like “My Leeware Box” and press Save. (Later on, you can just load the session, so you don’t have to do the previous steps again)

5. Press Open.

6. Now, a black screen should come up (terminal/command prompt).

7. Enter your root account details – (username, password)

8. Notice, when you type in the password, nothing appears on the screen! That’s not a bug – it’s normal. Btw, you can also paste the password by right click (again, putty won’t display anything on screen).

9. At this point, you should be logged on. Yay, we can install some stuff now.

10.   Type yum -y install xterm wine vnc-server to install those 3 apps: xterm (a GUI terminal), wine (to emulate windows), and VNC server (to allow you to remote control your server with a GUI).

11. After a while, you should see that those 3 apps are installed.

12. Download uTorrent onto your server. Type wget http://download.utorrent.com/1.6.1/utorrent.exe

13. Start VNC server, type vncserver :1

14. Enter any password of your choice for the VNC server.

15. Now, VNC server should be started. So, you can login with VNC viewer (which you installed on YOUR PC).

16. The server address is: :1 or :1. (e.g. vps778.leeware.com:1)

17. Now, a desktop should appear with a terminal/command prompt on the top left hand corner.
18. Run uTorrent. Type wine utorrent.exe.

19. uTorrent should be up and running now. Also, you should go to preferences and change the settings to whatever you want.

But, what about webUI?

Well, you can install the WebUI through SSH, but since lots of people don’t know about how to get files from their box to their HDD,, here’s another guide to teach them how to do it using SFTP.

1. On uTorrent, go to preferences and on the side tree, go to Advanced >> WebUI –           tick Enable Web Interface and also, put your desired username and password for the webUI.

2. I also recommend putting an alternative port (8080 is fine).

3. Now, use your FTP client and login to your server. Put SFTP as the mode, put in the hostname/IP and port should be the default 22.

4. Boom! You should see all the files in your server now.

5. Browse to /root/.wine/drive_c/windows/profiles/root/Application Data/uTorrent/

6. Get WebUI and extract webui.zip. Now, transfer webui.zip to the directory that I specified above (through SFTP of course). Btw, you usually just to drag and drop the file.

7. Voila! WebUI is installed.

But, where is it, where’s the WebUI?

Go to http://hostname:port/gui/ with your browser and login with your chosen username and password. For example: http://vpsxxx.leeware.com:8080/gui/

More Frequently Asked Questions

Will uTorrent still run if I close VNC and Putty?
Yeah, it will still run. VNC and Putty is just to control your server.

How do I add torrents to the WebUI?
Well, that’s simple – just press the (+) button on the WebUI. Alternatively, you might want to get this firefox extension so you can just drag and drop links from torrent sites.

Yeah, so I get all this. But how do I download stuff from the box to my server?
Use FTP. When you installed the WebUI, you’re basically uploading webui.zip on to the server. Here, you do the reverse (Yeah, you can drag and drop).

GRRR! I’m getting slow speeds! What do I do?
If you used the speed guide on uTorrent and set it to xxx/100mbps, you should be getting the maximum speeds out of your leeware. You have to also remember that speeds depend on the torrent as well (I suggest you check peers list to see others’ speeds). Other than that, I HAVE NO CLUE ON HOW TO IMPROVE THE SPEED (please don’t PM me about this). Live with it, or if you’re getting ridiculously low speeds then email lee.

OMG, Where does uTorrent save the files?
Wherever you set it to in Preferences. The default is /root/. (There’s nothing wrong with the default directory btw, you don’t need to change it.)

My server just crashed and WebUI ain’t running anymore, what do I do?
Well, it’s a simple process. Just login to your server using Putty. Type vncserver :1 to run VNC server again. Login to the VNC server using VNC viewer, and run uTorrent from the terminal – wine utorrent.exe. Now, everything should be fine. (For people who are more 1337 with Linux, if you want you can edit the VNC start up file (on ~/.vnc/ to run uTorrent automatically when VNC starts to make life easier).

How do I run Firefox and do other stuff on the server?
This guide is only for installing uTorrent and plus, on a Leeware, there’s really no point installing Firefox and other applications because it’s so slow (you get what you pay for).

Will you be making a guide for installing TorrentFlux, rTorrent, and etc?
No, IMO uTorrent is highly superior to the other clients. The WebUI is sexy

I tried this on a Leaseweb Express server but it doesn’t work.
Yeah, leaseweb servers doesn’t have SFTP. The installation process is a bit more complicated. First, you need to add a repository (like RPMForge) which contains: xterm, wine, vnc-server and etc. You also need to install fonts (msttcorefonts) and you’d need to install WebUI by using wget and unrar (not built-in you need to install this as well). You might also want to install an FTP server (proftpd), you would also need to configure it after it’s installed.

P.S. This guide might contain some errors – so feel free to comment and give feedback.

Further, to the above guide, this guide is on

Howto setup a second utorrent on a Linux :

1 – Ask your server company to attribute you a new IP address (free for leaseweb and vectoral box, and some cost for leeware). This way, you will be able to bind different IP addresses to each instance of utorrent running. You will avoid a lot of issued caused by using the same IP to connect to one tracker with two different user names! If you plan to share your seedbox, this case will happen for sure.

2 – Login as root with putty on your server

3 – Type “adduser utorrent” or whatever name you want instead of utorrent

4 – Type “passwd utorrent” to change the user password

5 – Type “cd /etc/sysconfig/network-scripts”

6 – Type “cp ifcfg-eth0 ifcfg-eth0:1”, this new file will have to contain your new IP address

7 – Type “vi ifcfg-eth0:1”, the file should look like this :

DEVICE=eth0
BOOTPROTO=static
HWADDR=**:**:**:**:**:**
IPADDR=**.**.**.***
NETMASK=255.255.255.0
ONBOOT=yes
TYPE=Ethernet

8 – Edit the file to make it look like this :
(vi command guide : http://www.cs.colostate.edu/helpdocs/vi.html)

DEVICE=eth0:1
BOOTPROTO=static
HWADDR=**:**:**:**:**:**
IPADDR=Your new IP address
NETMASK=255.255.255.0
ONBOOT=yes
TYPE=Ethernet

9 – Type “/sbin/service network restart” , the new ip is now functionnal

10 – Type “su utorrent”

11 – Type “vncserver :2”, you will have to set a password

12 – Open TightVNC viewer on your PC.

13 – On the TightVNC shell window, type wine notepad.exe, close the application once it’s open.

14 – Type “cd /home/utorrent/.wine/drive_c/windows/system32”

15 – Type “wget http://download.utorrent.com/1.6.1/utorrent.exe” to install utorrent

16 – Type “wine utorrent.exe” to start utorrent

17 – Go the speed setup as usual, after all done, go into
Options->Preferences->Advanced and set the following variables :
net.bind_ip
net.outgoing_ip
to your new IP address

That’s it! You now have two utorrent instances running with different IP address

Standard